


Introduction: How to Start a Blog Post (Step-by-Step for Beginners)
Your first blog post doesn’t need to be perfect - it needs to be clear, useful, and easy to finish. This introduction sets the tone for a simple, repeatable workflow you can use today to write a single high-quality blog post that ranks, converts, and builds momentum for your content strategy. Whether you’re a solo creator or a busy SaaS team, BlogBowl makes the process faster with AI-assisted research, built-in SEO, automatic internal links, AI images, newsletter publishing, and analytics - all in one place.
"Users typically read only 20% to 28% of the words on a webpage." - Source
Why this matters: scannability wins. We’ll show you how to structure your post with strong subheads, bullets, short paragraphs, and visuals so readers (and search engines) get value fast.
Who this guide is for
Absolute beginners who want a no-fluff “blog starter” system to write a great first blog post.
Busy SaaS teams that need a streamlined, repeatable process to write a blog, ship on schedule, and measure impact without extra tools.
What you’ll learn
A start-to-finish workflow: idea → research → outline → draft → format → SEO → publish → promote → measure → improve.
Practical checklists, templates, and examples designed for one high-quality blog post you can publish today.
Where BlogBowl automation accelerates each step - AI topic ideas, keyword research, internal linking, SEO metadata, AI images, embedded videos, newsletter send, and analytics.
How this guide improves on typical “blog starter” posts
Outcome-first: focuses on writing a single blog post that ranks and converts (not just setting up a site or tossing generic tips).
Actionable and skimmable: clear subheads, bullets, and mini-checklists so you can move from draft to publish quickly.
Built-in growth loop: promotion, newsletter distribution, and measurement are part of the process - not afterthoughts.
Automation where it counts: BlogBowl removes friction with automatic internal links, SEO fields, performance insights, and AI-generated media.
Outcome
By the end, you’ll have:
A polished, SEO-optimized blog post ready to publish and promote.
A lightweight, repeatable process to write your next posts faster - with BlogBowl handling the heavy lifting behind the scenes.
Step 1 - Define Goal, Audience, and Outcome (Run the “So What?” Test)

"What are you trying to achieve? What information, exactly, are you trying to communicate? And why should your audience care?" - Source
Clarify the purpose (1–2 sentences)
What problem does this post solve for the reader?
What business outcome should it drive (subscribe, demo, share, trial)?
Use this micro-template:
Reader problem: “This post helps [audience] solve [specific problem] by [high-level approach].”
Business outcome: “Success = reader takes [one action: subscribe/demo/trial/share] after reading.”
Example: “This post helps beginner SaaS marketers launch their first SEO article by following a 10-step checklist. Success = 10% of readers download the checklist and join our newsletter.”
Pro tip (BlogBowl): Save this as a reusable “Post Brief” so every new article starts with a crisp goal.
Identify the reader and their search intent
Level: beginner vs. advanced
Intent: informational (learn), navigational (find a brand/page), transactional (compare/buy), commercial investigation (evaluate options)
Primary search question:
“When a reader types into Google/AI: ‘[exact question/keyword],’ they expect: [short answer/outcome].”
Quick prompts:
If beginner + informational → define terms, step-by-step, visual aids.
If advanced + commercial investigation → comparisons, ROI, data, objections.
Pro tip (BlogBowl): Auto-detect intent and difficulty from your target keyword; get suggested subtopics based on what’s winning in SERPs and AI answers.
Choose the post type
Match the format to intent:
How-to (step-by-step) → “how,” “guide,” “tutorial,” “setup”
Listicle → “ideas,” “tips,” “tools,” “mistakes,” “best”
Checklist → “launch,” “audit,” “review,” “QA”
Opinion/analysis → “why,” “trends,” “framework,” “state of…”
Decision rule:
If the query starts with “how/learn/build” → How-to
If the query includes “best/top/tools/alternatives” → List or comparison
If the query includes “template/checklist” → Checklist
If the topic is emerging or contrarian → Opinion/analysis
Pro tip (BlogBowl): Insert the right template (how-to, list, checklist) with one click and prefill scaffolded H2/H3s.
Define your one CTA
Pick a single primary CTA and align it with intent:
Informational → “Download the checklist” or “Join the newsletter”
Commercial investigation → “Compare plans” or “Start free trial”
Transactional → “Book a demo” or “Start now”
Place it:
Above the fold (inline), after the intro, and once near the conclusion (consistent wording).
Pro tip (BlogBowl): Use dynamic CTA blocks that A/B test copy and auto-embed in post templates.
Competitive gap scan (5–10 minutes)
Skim the top 3–5 results for your target query. Note:
H2/H3 coverage: Which steps or questions are missing?
Depth: Any weak sections with thin examples or no data?
Media: Lack of visuals, checklists, tables, or video?
Freshness: Outdated screenshots or tactics?
UX: Walls of text, no summary, no TL;DR, poor scannability.
Decide how you’ll be different/better:
Add the missing step: “[Step X] that everyone skips”
Include a checklist, template, or calculator
Provide real examples (before/after, metrics)
Summarize with a TL;DR and action steps
Show workflows with annotated visuals
Pro tip (BlogBowl): Pull competitor outlines, auto-generate a gap list, and insert missing subheads into your draft.
Step 2 - Validate Topic, Keywords, and Build a Fast Outline
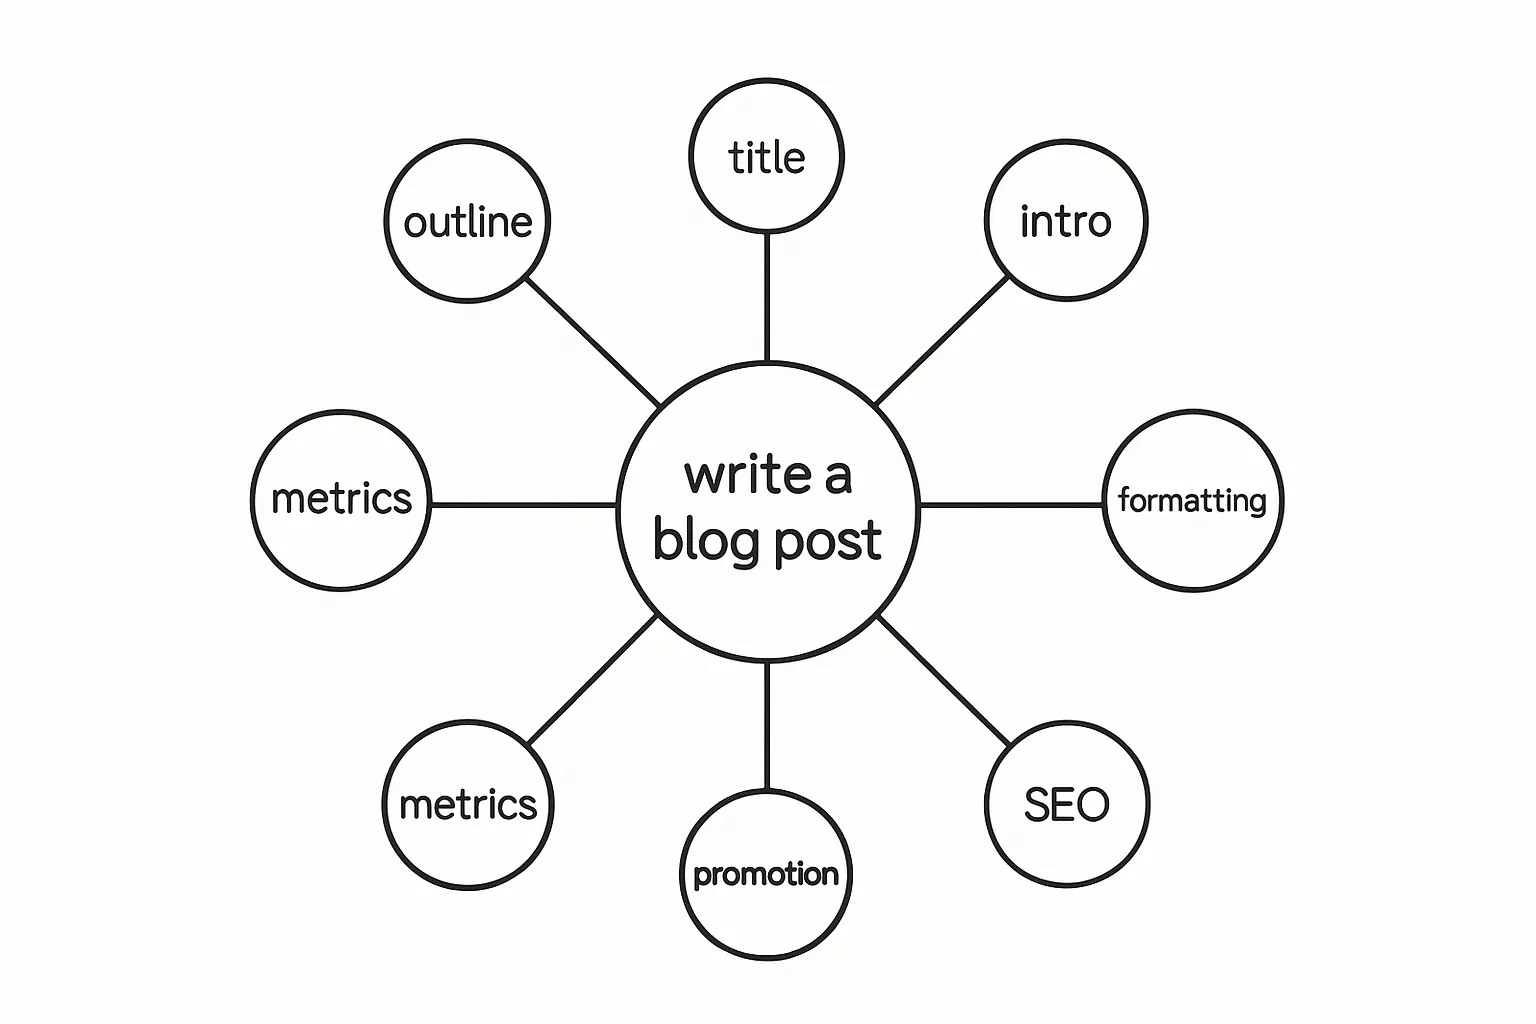
Quick research workflow (15–20 minutes)
SERP scan: Check “People Also Ask,” related searches, and apply the News filter to see freshness cues and evolving angles.
Community scan: Skim Reddit threads, Slack/Discord groups, and X/LinkedIn conversations for real language, objections, and examples.
Note patterns: Capture recurring subtopics, definitions readers need, and common objections - these become your H2/H3s and FAQ.
Pro tip (BlogBowl): Paste your seed keyword to get an instant snapshot of trending questions, intent, and freshness signals, plus a suggested outline scaffold.
Keyword basics for a single blog post
Choose one seed keyword (e.g., “write a blog post”) and 3–5 close variants:
“how to write a blog post,” “blog post outline,” “write a blog introduction,” “format a blog post,” “blog post SEO”
Map variants to subheads/FAQ:
H2s: “Create a Blog Post Outline,” “Write a Strong Introduction,” “Format for Scannability,” “On-Page SEO Basics”
FAQ: “How long should a blog post be?”, “What’s a good keyword density?”
Pro tip (BlogBowl): Auto-inserts variants into relevant subheads and recommends internal links to related posts.
Craft a working title with intent clarity
Use number/benefit/clarity; keep under ~60–70 characters:
“How to Write a Blog Post: 10 Steps to Draft Faster (and Rank)”
“Write a Blog Post in 60 Minutes: A SaaS-Friendly Workflow”
Mirror the reader’s query so CTR improves on SERP.
Outline template (copy/paste)
Hook/Intro (problem → promise → proof)
5–7 core sections (each answers one reader question)
FAQ (optional)
CTA + next step
Example scaffold:
Intro: Why your first post must be scannable and useful
Step 1: Define goal, audience, outcome
Step 2: Validate topic, keywords, outline
Step 3: Draft fast (templates, examples)
Step 4: Format for readability
Step 5: On-page SEO and internal links
Step 6: Publish, promote, measure
FAQ
CTA: Download checklist / Start free trial
Pro tip
Decide your examples and assets now to speed drafting:
Images/diagrams: lifecycle graphic, topic cluster, before/after formatting
Checklist: 10-step publishing QA
Table: headline formulas
Snippets: example intros, CTAs
Headline formula cheatsheet
Formula | Example | When to use |
|---|---|---|
How to [Result] in [Timeframe] | How to Write a Blog Post in 60 Minutes | Fast-start guides |
[Number] Steps to [Outcome] | 10 Steps to Draft a High-Ranking Blog Post | Process posts |
[Number] [Tips/Ideas/Mistakes] for [Audience/Topic] | 17 Formatting Tips for New Bloggers | Lists and roundups |
The [Audience] Guide to [Topic] | The SaaS Marketer’s Guide to Blog Outlines | Pillar/evergreen |
[Result] Without [Pain] | Rank Faster Without Burnout | Benefit-led angles |
[Question]? Here’s How | Struggling to Start a Blog Post? Here’s How | Problem-solution |
[Framework]: [Outcome] | The FAST Outline Method: Draft Posts in Half the Time | Thought leadership |
[Comparison]: [X] vs. [Y] | Listicle vs. How-To: Which Post Wins for SEO? | Evaluation intent |
Step 3 - Draft the Post: Hook, Story, and Value (Write Fast)
Write the intro last (but plan it now)
Problem: name the pain succinctly (one line).
Promise: state what the reader will achieve by the end.
Proof: add a quick authority cue (experience, data, or result).
Use this mini-template:
Problem: “You want to write a blog post that ranks, but blank-page syndrome kills momentum.”
Promise: “In 60 minutes, you’ll ship a draft with a clear structure, strong subheads, and built-in SEO.”
Proof: “This is the same workflow we use at BlogBowl to publish daily, SEO-optimized posts.”
Draft your intro later, after the body is complete - when you know exactly what you’re introducing.
Mini-CTA: Want a copy-paste intro template? Download the “Problem–Promise–Proof” card in BlogBowl.
Draft in focused sprints
Time-box: 30–45 minutes writing, 10–15 minutes break; repeat 2–3 cycles.
Do not edit while drafting. If you don’t know a detail, drop a [TK] marker (e.g., “Include stats here [TK]”).
Fill obvious gaps with “XX” and keep moving; research plug-ins come later.
Sprint order:
Write H2s first (your roadmap).
Under each H2, write a 1–2 sentence “point” that answers the reader’s question.
Add a quick example or mini-story to make it stick.
Pro tip: Use BlogBowl’s distraction-free editor and [TK] highlights to collect all “return later” items in one click.
Body sections = mini-outcomes
Every H2 should resolve one reader problem. Treat each section like a micro-journey:
Start with a one-sentence “why” (the benefit).
Give the step or technique in 3–5 bullets.
Add a tiny example (before/after, short case).
Example (described, no images):
Before: A dense 7-line paragraph explains “formatting for SEO” with no structure.
After: One lead sentence (“Formatting guides scanners and boosts dwell time”), then bullets:
Use H2s/H3s to mirror search intent.
1–2 sentence paragraphs; break walls of text.
Bulleted lists for steps, tables for comparisons.
Add a TL;DR summary at the end.
Result: Readers see answers fast; search engines understand structure.
Mini-CTA: Try the BlogBowl outline-to-draft feature - auto-expands your H2s into paragraph starters.
Voice and clarity
Conversational tone: write like you talk to a smart colleague.
Short sentences: average 12–18 words; vary length for rhythm.
Vivid verbs: “show,” “prove,” “ship,” “optimize” beat “be” and “have.”
Active voice > passive voice.
Trim filler: actually, very, really, that, in order to, due to the fact that.
Ban “throat clearing”: “In this article, we will…” (replace with a hook).
Quick clarity pass (60 seconds per section):
One idea per paragraph? If not, split it.
Does the first sentence tell me the point?
Can I cut 10% without losing meaning?
Did I give one concrete example?
Mini-CTA: Turn on BlogBowl’s readability assistant to flag long sentences, passive voice, and filler in real time.
Add a mini-CTA at the end of 1–2 sections
Drop a lightweight, intent-matched prompt where momentum is highest:
“Download the 10-Step Drafting Checklist.”
“Steal the H2/H3 outline template.”
“Start your free trial of BlogBowl to auto-link related posts.”
Keep it one line, action-first, and relevant to the section’s outcome.
Step 4 - Format for Readability and Conversions

Scannability rules
Use H2 for major sections; H3 for steps and examples that live under each section.
Keep paragraphs to 2–4 sentences; add white space and bullet lists to break walls of text.
Lead each section with a one-sentence takeaway; end with a quick action or mini-summary.
Pro tip (BlogBowl): Auto-generate skimmable H2/H3 structure and convert long paragraphs into bullets in one click.
Conversion elements
Choose one primary CTA (e.g., “Start free trial”) and one optional secondary CTA (e.g., “Download checklist”).
Place CTAs early (below intro) and late (near conclusion) with consistent copy.
Add contextual internal links to cornerstone content where readers need deeper detail.
Pro tip (BlogBowl): Dynamic CTA blocks A/B test copy and auto-insert internal links to your most authoritative posts.
Trust builders
Use sourced quotes and data points to anchor claims.
Add concise definitions and glossary callouts for unfamiliar terms.
Include a brief author bio with credentials and a link to your methodology or sources page.
Pro tip (BlogBowl): One-click citations and auto-formatted callout boxes keep sources consistent.
Accessibility & inclusivity
Use descriptive link text (“Download the SEO checklist”) instead of “click here.”
Prefer clear, plain language; define necessary jargon on first use.
Ensure sufficient color contrast, logical heading order, and readable font sizing.
Caption images and provide alt text that describes purpose, not just appearance.
Pro tip (BlogBowl): Built-in accessibility checks flag missing alt text, heading skips, and low-contrast components.
Example wireframe
Title → Hook intro
Step sections (H2/H3) with bullets and short paragraphs
FAQ (optional)
CTA box (primary + secondary)
Author/byline with credentials
Related posts
Formatting checklist
Item | Why it matters | Quick check |
|---|---|---|
H2/H3 hierarchy | Helps skimmers and SEO understand structure | Headings reflect keyword variants and intent |
Short paragraphs | Improves readability, reduces bounce | 2–4 sentences per paragraph on average |
Bulleted/numbered lists | Highlights steps and key points | Each list item starts with an action verb |
Lead sentence per section | Gives instant takeaway | First sentence states the benefit or result |
Internal links | Increases depth, session duration, SEO | 2–4 contextual links to cornerstone pages |
Primary + secondary CTA | Guides action without overwhelm | Consistent CTA copy; placed top and bottom |
Callouts (quotes/data/defs) | Builds trust and clarity | Each claim has a source or definition |
Alt text and captions | Accessibility and context | All images have descriptive alt text |
Contrast and font size | Legibility for all users | Passes contrast checks; line height ~1.5 |
Mobile spacing | Prevents cramped layouts | Adequate padding; tap targets >44px |
Table of contents (optional) | Faster navigation, better UX | TOC anchors match H2/H3 structure |
TL;DR summary | Serves scanners; improves retention | 3–5 bullets summarizing the post near top |
Pro tip (BlogBowl): Run the “Format & UX” optimizer to auto-check headings, lists, alt text, and CTA placement before publishing.
Step 5 - On-Page SEO Essentials for a Single Blog Post
Place keywords where they count
Title/H1: Use the seed keyword or a close variant (“How to Write a Blog Post”).
First 100 words: Reconfirm topic and reader benefit.
1–2 H2/H3s: Map close variants naturally (“Blog post outline,” “Format a blog post”).
URL slug: short, descriptive, hyphenated (e.g., /write-a-blog-post).
Conclusion: Restate the promise with the seed keyword to reinforce relevance.
Quick check:
Can a skim reader identify the topic in 5 seconds from title + first paragraph?
Does each placement feel natural and reader-first?
Meta title and description
Meta title ≤ 60 characters, include keyword + benefit.
Meta description ~150–160 characters, add a clear value + CTA.
Templates:
Meta title: “How to Write a Blog Post: 10 Steps to Draft Faster”
Meta description: “Draft a high-quality blog post fast. Follow our 10-step workflow with SEO, formatting, and promotion tips. Download the checklist.”
Schema (optional but helpful)
FAQ schema: Use when you include 2–6 clear, concise Q&As.
HowTo schema: Use for linear tutorials with explicit steps.
Article schema: Standard; ensure headline, author, datePublished are accurate.
Tip:
Keep FAQ answers ≤ 40–50 words to increase snippet eligibility.
Internal & external links
Internal: 2–4 links to relevant posts (guide, glossary, case study). Use descriptive anchor text (e.g., “blog post outline template”).
External: 1–2 authoritative sources (research, standards, original data).
Add a “Related reading” block near sections where readers often need depth.
Navigation hygiene:
Avoid linking multiple times to the same target with different anchors in one section.
Keep total links purposeful; prioritize UX over volume.
Image optimization
Alt text: Describe the image’s purpose in context (“Topic cluster diagram for ‘write a blog post’ with subtopics: outline, intro, SEO”).
Compression + modern formats: Use WebP/AVIF when possible; keep images <150KB where feasible.
Captions: Add when the image communicates data or a key concept.
File naming:
use-hyphenated-descriptive-names.webp (not IMG_1234.webp).
Featured snippets & AI answers
Definitions: Add 1–2 sentence definition boxes for key terms (e.g., “A blog post outline is…”).
Steps: Numbered lists for how-tos; one imperative verb per step.
Tables: Use for comparisons or frameworks (clean, 3–6 rows).
TL;DR: A brief summary near the top helps skimmers and snippet extraction.
Snippet-friendly writing:
Answer the core query directly in the first paragraph (1–2 sentences).
Use consistent, plain language; avoid hedging.
Where BlogBowl helps automatically
Keyword assist: Suggests seed + variants and maps them to H2/H3s.
Meta generation: Drafts meta title/description aligned to SERP limits.
Internal linking: Auto-recommends contextual links to cornerstone content.
Image helpers: Prompts for alt text, compresses images, and suggests captions.
Snippet blocks: One-click definition, steps, and table components designed for featured snippets.
Daily ideas: AI-curated post ideas with search intent and freshness signals.
Pro tip: Before publishing, run BlogBowl’s “SEO Preflight” to validate meta length, slug, headings, internal links, and snippet elements in one pass.
Step 6 - Visuals and Media that Elevate Your Blog Post
Great visuals make your blog post easier to scan, remember, and share. Use them to clarify a point, not to decorate a page.
What to create
Simple process diagrams: show step flow (e.g., Idea → Research → Outline → Draft → Edit).
Comparison mini-tables: highlight differences (e.g., List vs. How‑to vs. Checklist).
Annotated examples: brief “before → after” with callouts pointing to the improvement.
Definition cards: 1–2 lines that clarify a term right where the reader needs it.
Tip: If a paragraph is doing too much work, turn it into a diagram or a 3–5 row table.
Visual consistency
Use your brand kit: consistent colors, fonts, and icon style across all images.
Limit the palette: 1 primary, 1 secondary, 1 accent. Reserve red for warnings/errors.
Accessibility-first contrast: WCAG-compliant contrast (≥ 4.5:1) for text and annotations.
Consistent strokes and corner radii: lines, arrows, and boxes should match throughout.
Media guidelines
Keep it lean: 1 embedded video max per post; 2–4 purposeful images total.
Right visual, right place:
After an H2 to summarize the section
Next to a step list to preview the outcome
Near a CTA to reinforce the benefit
Always include:
Descriptive alt text that conveys the purpose
Short captions when the image carries meaning (data, comparisons)
Lightweight formats (WebP/AVIF), compressed for fast loads
Fast creation tips
Repurpose: turn slides, whiteboard photos, or support docs into clean diagrams.
Template your callouts: prebuilt “Note,” “Warning,” “Example” styles for quick reuse.
Batch production: script 2–3 visuals per post in one sitting to maintain consistency.
AI assist: generate on-brand diagrams or spot illustrations, then add your own labels.
Reuse frameworks: a single topic-cluster sketch can support multiple posts.
BlogBowl advantage
AI-generated, on-brand images: unique diagrams and illustrations that match your palette and typography.
Smart placement: automatic suggestions for where visuals best reduce friction (after H2s, near FAQs, beside CTAs).
Built-in performance: image CDN, lazy loading, WebP conversion, and alt-text prompts by default.
Content-aware embeds: paste a reputable URL and BlogBowl formats the video block accessibly with captions support.
Quick visual QA (60 seconds):
Does this visual clarify a specific point in the text?
Is the text legible on mobile (min 14–16px in the image)?
Would a skimmer understand the takeaway in 3 seconds?
Is the file size as small as possible without losing clarity?
Keep visuals purposeful, consistent, and accessible - your readers (and your rankings) will thank you.
Step 7 - Publish and Distribute Like a Pro
Pre-publish QA (5-minute checklist)
Headings hierarchy: H2 for sections, H3 for steps; no skipped levels.
Links: Internal and external links open correctly; no duplicates; add UTM where needed.
Images: Compressed (WebP/AVIF), descriptive alt text, meaningful captions if they carry insight.
Meta: SEO title ≤ 60 chars, description ~150–160 chars, clean URL slug.
Schema: Validate FAQ/HowTo (if used) with a checker; dates and author fields accurate.
CTA: Primary CTA visible above the fold and again near the conclusion.
Accessibility: Descriptive link text, sufficient contrast, logical focus order.
Speed: Page passes core basics (no oversized images, no blocking scripts).
Final skim: TL;DR present, no orphan sections, no placeholder [TK] items.
Instant distribution
Email newsletter: Send a short, benefits-led teaser with 1–2 takeaways and a single CTA.
Social: Post a native thread on X and a carousel/short post on LinkedIn; add 1–2 key visuals.
Communities: Share in relevant Slack/Discord groups with a question to spark discussion.
Syndication: Republish an excerpt on Medium/LinkedIn with a canonical link back to your blog.
SEO ping: Request indexing in Search Console and submit the URL to Bing Webmaster Tools.
Quick copy template (paste and tweak):
Subject: New: [Result] in [Time] - Our step-by-step guide
Social hook: Struggling to [problem]? Here’s the 10-step workflow we use to ship posts that rank (template inside).
Smart repurposing
Turn sections into:
X threads (1 core idea per section, end with the checklist CTA).
LinkedIn carousels summarizing steps or frameworks.
Short vertical videos (30–60s) that demo one tactic or before/after.
Create a downloadable:
1-page checklist or template to grow subscribers.
Pitch guest content:
Offer a condensed version to partner blogs/podcasts with a unique angle.
BlogBowl automation
One-click newsletter: Convert your post into a clean email with pre-filled subject lines and snippets.
Cross-posting: Publish to multiple blogs/workspaces and set canonical links automatically.
Social scheduler: Auto-generate post snippets, schedule across X/LinkedIn, and queue reposts for optimal times.
Internal linking: Automatic suggestions and insertion to related posts; updates when new content goes live.
UTM + analytics: Built-in campaign tags and dashboards to track opens, CTR, time on page, and conversions.
Content refresh reminders: Set a review date; BlogBowl flags freshness opportunities and suggests updates.
Pro tip: Ship first, then amplify. Schedule a 7-day promotion drip (day 0: newsletter; day 1–3: social + community; day 5: republish excerpt; day 7: recap thread with results).
Step 8 - Measure, Learn, and Improve
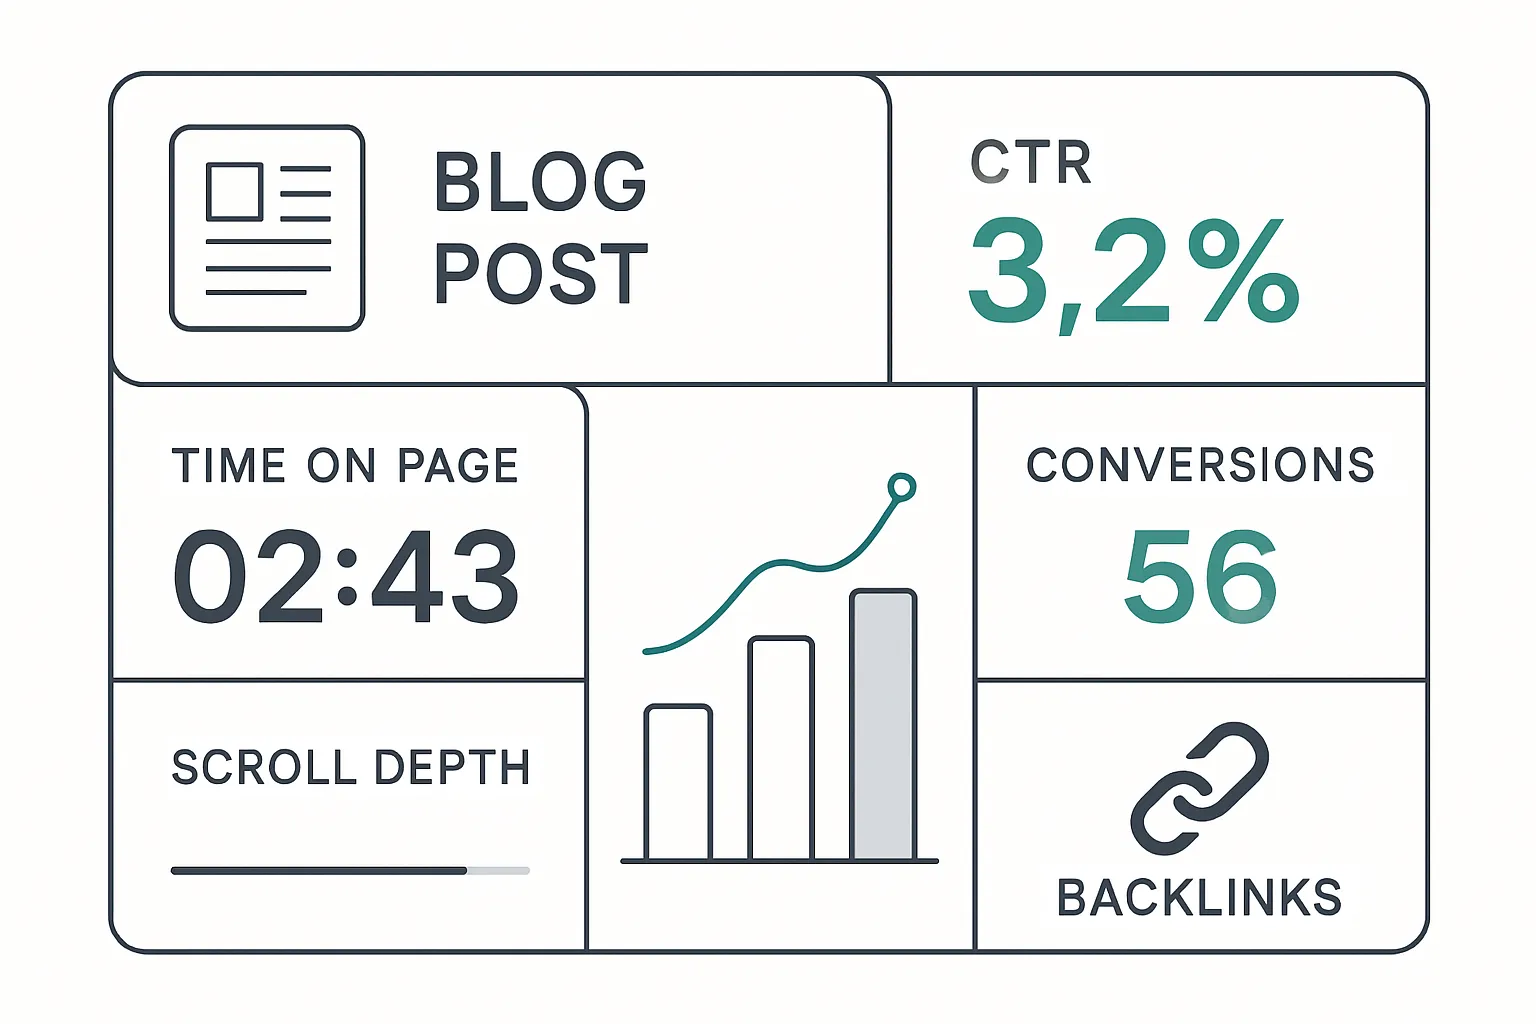
Core metrics to watch
Click-through rate (SERP): Are your title/meta earning the click?
Time on page: Does the content hold attention?
Scroll depth: Where do readers drop off (and why)?
Conversion: CTA clicks, signups, trials, demo requests.
Backlinks: New links, quality, and referring domains.
Tie each metric to a clear action:
Low CTR → test new titles/meta and refine the hook.
Shallow scroll → move value up, add TL;DR, tighten intros.
Low conversion → sharpen CTA, reposition, or add a low-friction offer.
Review cadence
24–48 hours: Fix UX issues (broken links, slow media), tweak title/meta if CTR is under benchmark.
7 days: Identify weak sections by scroll/engagement; add examples, bullets, or visuals. Insert contextual internal links.
30–60 days: Update with fresh data, screenshots, or mini-case studies; consider adding 2–3 FAQs based on reader questions.
Pro tip: Annotate traffic spikes (social mentions, newsletter sends, partnerships) so you can attribute changes.
Systematic updates
Build an update log (date, change, hypothesis, result).
Track pre/post metrics: CTR, time on page, conversion, ranking movement.
Retire or merge: If a post underperforms after multiple iterations, consider merging with a stronger page.
Update log template:
Date:
Change made:
Hypothesis:
Metrics watched:
Result after 14/30 days:
Next action:
BlogBowl analytics
Privacy-friendly analytics: See post-level CTR, time on page, scroll maps, and conversions without cookies.
Keyword movement: Track target terms and discover rising variants you’re already ranking for.
Internal-link impact: Measure how new internal links change engagement and conversions.
Automatic backlink exchange: Opt-in network that helps you earn relevant, high-quality links to build authority.
Refresh alerts: Get nudge reminders when a post’s freshness or engagement drops - complete with suggested updates.
Close the loop: measure, learn, and ship improvements. Small, consistent updates compound into outsized gains.
Conclusion - Start Writing Smarter with BlogBowl
Recap
You now have a repeatable system to plan, draft, format, optimize, publish, promote, and improve any blog post.
You’ve learned how to validate a topic and keywords, build a fast outline, draft in focused sprints, format for scannability and conversions, nail on-page SEO, add purposeful visuals, distribute smartly, and iterate using real metrics.
Your next 30 minutes
Pick a seed topic and run the “So What?” test to define goal, audience, and outcome.
Build a 7-headline outline and a working title that matches search intent.
Open BlogBowl to generate AI-assisted briefs, on-brand images, smart internal links, and a ready-to-send newsletter so you can publish your first blog post without wrestling the tech.
Why BlogBowl
Launch in under 60 seconds with fast, SEO-optimized templates that rank.
AI-driven briefs, daily SEO ideas, and automatic internal linking to keep momentum.
Built-in newsletter and privacy-friendly analytics - no extra tools required.
Unique AI images and embedded videos generated on-brand to elevate every article.
Multi-blog management, authors, and domain integrations for teams that scale.
Call to action
Create your first post with BlogBowl today at https://www.blogbowl.io - let the platform handle the SEO, images, internal links, and distribution while you focus on writing content your readers (and search engines) love.