


Start Strong: What You’ll Build and Why It Matters
You’re about to craft a simple, repeatable blog workflow that takes you from idea to published blog post - without the chaos. By the end of this guide, you’ll know exactly how to create blog content fast, keep quality high, and publish with confidence. And if you’re using BlogBowl, you’ll supercharge the process with built-in SEO, AI-assisted drafting, and one‑click publishing.
What this guide covers
A beginner-friendly, repeatable blog workflow from idea to publish
Checklists, a 60‑minute sprint, and SEO essentials tailored for first‑time bloggers
Where automation and AI help (without replacing your voice)
Why your first blog post matters
Sets your voice, standards, and expectations for future pieces
Becomes your internal template for creating blog content consistently
Can generate early traffic, links, and newsletter signups when promoted well
"Content marketing costs 62% less than traditional marketing and generates about 3x as many leads." - Source
Use this ROI as your north star: a consistent workflow blog isn’t just about publishing - it’s about compound growth. Every well-structured post becomes an asset that ranks, gets cited, and feeds your author’s blog authority across search and AI-powered discovery.
What you need before you begin
Time: 60–90 minutes for your first pass; 30–45 minutes for edits
A topic idea tied to your audience’s real problem
Basic tools: notes app or doc editor, grammar checker, keyword tool
Optional (but powerful): BlogBowl to handle hosting, SEO templates, AI-assisted outlines, automatic internal linking, and analytics
SEO note (keywords to weave in naturally)
blog post
blog workflow
workflow blog
create blog content
author's blog
Tip: Don’t stuff keywords. Use them where they fit naturally - title, intro, H2s/H3s, and meta description. On BlogBowl, our SEO-optimized templates and AI prompts help you place them exactly where they’ll have the most impact.
Plan With Purpose: Audience, Goal, Keyword, and Intent
A strong plan turns an idea into a high-performing blog post. Spend a few focused minutes here and the rest of your blog workflow becomes faster, clearer, and easier to repeat.
1) Define your reader and job‑to‑be‑done
Who are they? Create a one‑line snapshot: role, experience level, and context (e.g., “SaaS founder, non‑technical, needs a first author’s blog post live this week”).
What do they already know? Note the baseline (terms, tools, or steps they understand) so you don’t over‑explain - or skip essentials.
What’s frustrating them now? List 1–3 blockers (e.g., “no structure,” “keyword confusion,” “blank page dread”).
Desired outcome: One sentence that finishes, “After reading, they can…” For example: “After reading, they can draft a working brief and outline to create blog content in under an hour.”
Tip: On BlogBowl, save this as a reusable reader profile so every new blog post starts with the right context.
2) Set a single, measurable goal for the post
Pick one outcome and define how you’ll measure it:
Newsletter signups (e.g., +25 subscribers in 14 days)
Demo bookings (e.g., 5 qualified demos from this post in 30 days)
Time on page (e.g., median ≥ 2:30)
Internal link clicks (e.g., ≥ 15% click‑through to a related guide)
Organic impressions and CTR for your target keyword (e.g., 5% CTR within 60 days)
Keep it singular. A focused goal makes your structure, examples, and CTA sharper - and your workflow blog metrics easier to improve.
3) Draft a working title and angle
Promise a clear result: “Write Your First Blog Post in 60 Minutes: A Simple Workflow” beats “Blogging Tips for Beginners.”
Include your core keyword naturally (e.g., “blog workflow,” “create blog content,” “author’s blog”).
Choose an angle that meets intent: how‑to, checklist, template, teardown. Your angle is the promise you must deliver.
Pro tip: Draft 5–7 variants, then pick the one that best matches your reader’s job‑to‑be‑done and the keyword’s search intent.
4) Pick one low‑competition keyword + validate search intent
Find specific, low‑difficulty phrases using any keyword tool (Ahrefs, Semrush, Ubersuggest, or BlogBowl’s built‑in research).
Prefer long‑tails that mirror practical tasks (e.g., “blog workflow for beginners,” “how to create blog content fast”).
Validate intent by Googling the term:
Scan top results: are they informative blog posts and guides (good) or product pages and shopping results (bad for this use case)?
Note common subtopics, content length, and media used (tables, checklists, images).
Identify gaps you can fill (clearer steps, better examples, updated data).
"Users typically scan web pages in an F‑shaped pattern, making headings, bullets, and front‑loaded sentences critical for comprehension." - Source
5) Capture your outline seed
Sketch your brief in 3–5 H2s that map to steps, questions, or subtopics:
H2: Problem and Promise
Bullets: reader pain points; 1–sentence promise; expected outcome
H2: Tools and Setup
Bullets: notes app, grammar checker, keyword tool; optional templates
H2: 60‑Minute Draft Sprint
Bullets: 10‑min outline, 30‑min draft, 10‑min polish; add examples
H2: On‑Page SEO Essentials
Bullets: title tag, meta description, headers, internal links, alt text
H2: CTA and Next Step
Bullets: single CTA tied to your goal; 2–3 relevant internal links
On BlogBowl, save this as a template so every author’s blog post starts from the same high‑quality structure with automatic internal linking suggestions.
Watch: 10‑minute demo
Quick walkthrough: audience → intent → working title → outline. See the embedded demo above in section 3 for a practical, start‑to‑finish example that turns an idea into a brief and outline fast.
Outline Fast: The 60‑Minute Workflow Blog Sprint
Outlining is the highest‑leverage step in your blog workflow. A clear structure helps you create blog content faster, stay on message, and publish with fewer rewrites.
Why outlining multiplies your writing speed
Prevents tangents by forcing you to prioritize what matters
Reduces rewriting because the logic is settled before prose
Clarifies the promise so your H2s lead readers to the exact outcome
The sprint you’ll follow
10 min: refine audience + outcome
15 min: outline H2/H3 structure
25 min: bullet the proof (examples, mini‑stories, stats)
10 min: write your intro and CTA draft
Pro tips
Limit sections to 3–5 key chunks; each answers one reader question
Make H2s skimmable and benefit‑driven
Use short, front‑loaded sentences in bullets to aid scanning
Park extra ideas in a “later” list - keep this post ruthlessly focused
60‑minute sprint schedule
Time block | Objective | What to produce | Quality bar |
|---|---|---|---|
0–10 min | Define reader and job‑to‑be‑done | One‑line reader profile + “After reading, they can…” outcome | Specific persona, one clear outcome tied to a problem |
10–25 min | Map structure | 3–5 H2s with supporting H3s | Each H2 answers a distinct question; no overlap |
25–50 min | Bullet the proof | Bullets under each H2: examples, mini‑stories, stats, internal links | At least 2 proofs per section; credible, concrete, scannable |
50–60 min | Draft intro and CTA | 3–5 sentence intro + one primary CTA aligned to goal | Hooks the pain, promises the result, single action step |
Visualize the pipeline
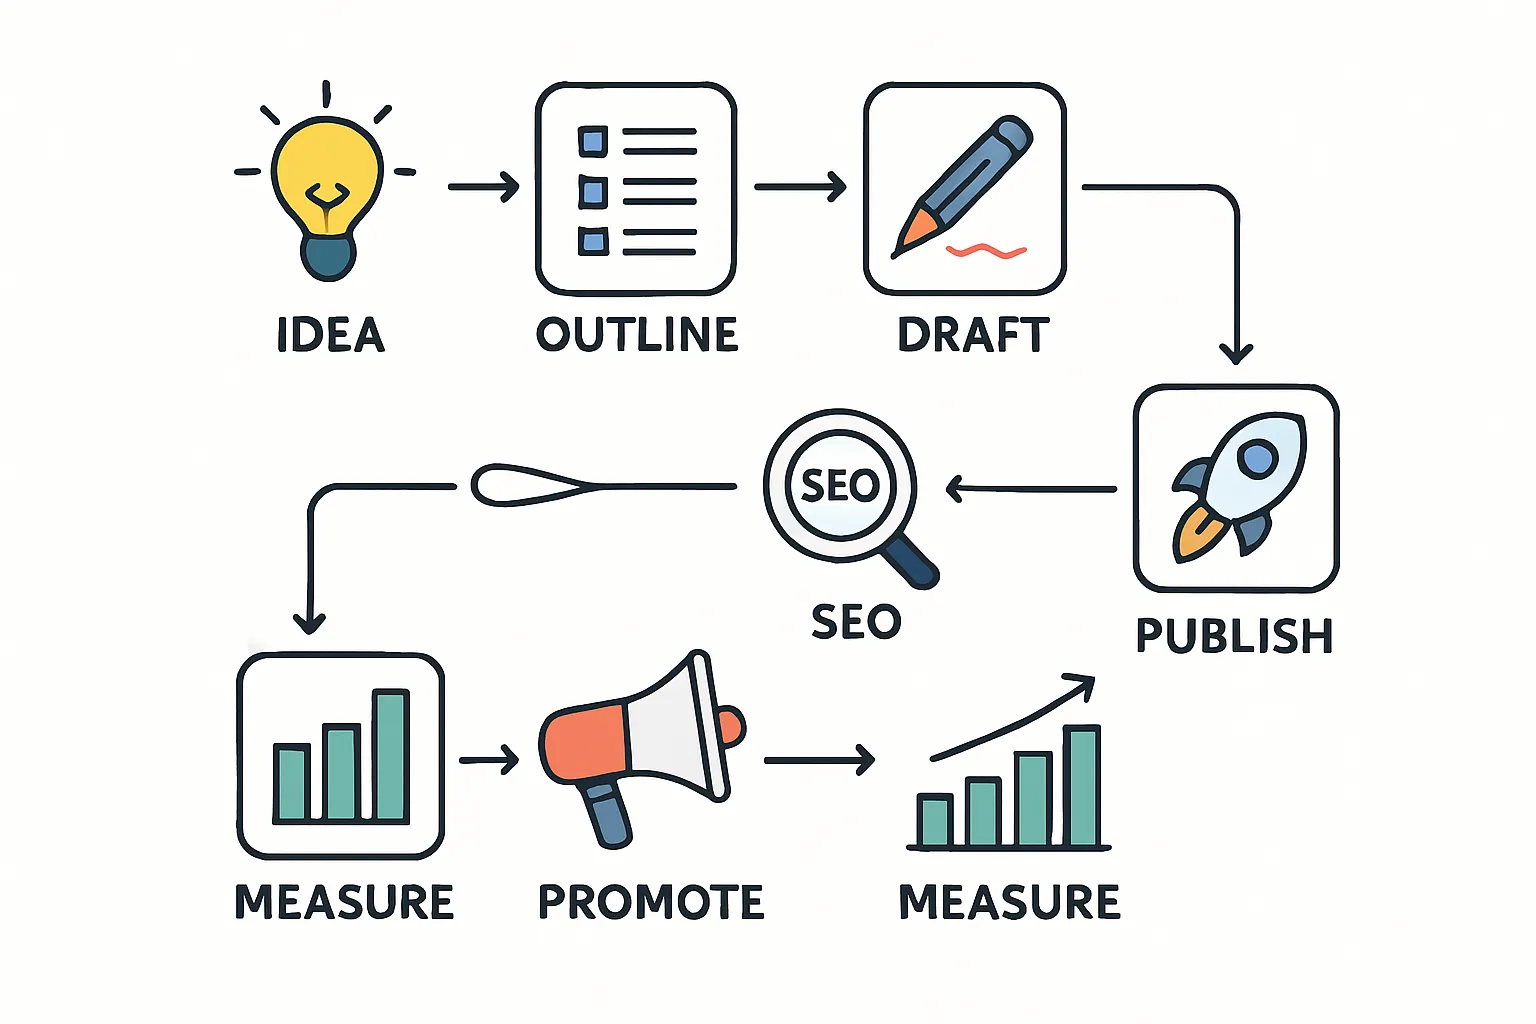
Idea → outline → draft → edit → SEO → publish → promote → measure
Keep this flow visible as you work. It prevents over‑editing too early and ensures every step moves you toward a publishable post - fast.
Draft the Blog Post: Hook, Structure, and Your Author’s Voice
Your outline is ready - now turn it into a clear, convincing blog post that readers (and search engines) love. This is where your hook, structure, and author’s voice do the heavy lifting inside a fast, repeatable blog workflow.
Nail the first 100 words (the hook)
Your opening sets expectations and earns attention. Aim for clarity over cleverness.
Start with a relatable problem: “You’ve got an idea, a deadline, and a blank page. Here’s how to publish in 60 minutes without sacrificing quality.”
Try a bold claim (and back it up): “You can draft your first author’s blog post today - and make it rank-ready.”
Offer a quick payoff: “Steal this 3-part template to create blog content that readers actually finish.”
Promise a specific outcome and set scope:
“In this post, you’ll draft a complete article using an H2/H3 framework, add proof bullets, and finish with a single, conversion‑ready CTA.”
Pro tip: Within the first 100 words, naturally include your core keyword (e.g., blog post, blog workflow, workflow blog, create blog content, author’s blog).
Build a scannable structure readers love
Most readers skim first, then decide whether to read. Design for scanners.
H2s as steps or questions; H3s for details and sub-steps.
Short paragraphs (1–3 sentences) with white space.
Bullets for lists; bold key phrases that carry meaning.
Use this simple skeleton:
H2: Problem and Promise
H3: What’s blocking you right now
H3: What you’ll walk away with
H2: Steps (or Checklist)
H3: Step 1
H3: Step 2
H2: Proof and Examples
H3: Micro‑story
H3: Quick stat or mini‑case
H2: Wrap‑Up + CTA
On BlogBowl, our SEO‑optimized templates map this structure automatically and suggest internal links, so you focus on writing - not formatting.
Find your author’s blog voice
Your voice builds trust. Write like you’re helping one person solve one problem.
One reader, one conversation: use “you,” avoid committee-speak.
Avoid jargon unless you define it in a short, friendly sentence.
Use micro‑stories and examples to prove each point.
Before (corporate): “Organizations should operationalize an ideation framework to expedite content production.” After (conversational): “Start a simple idea list. When it hits five solid topics, pick one and outline it.”
Micro‑story example:
“Yesterday, a founder told us she spent two hours rearranging a headline. We set a 10‑minute timer, wrote three options, and picked one. She shipped the post an hour later.”
Voice checkpoints:
Would you actually say this out loud to a customer?
Is the benefit obvious in the first sentence of each section?
Can a busy reader pick up the thread by scanning only H2s?
Keep momentum with drafting rules
Speed matters - draft first, edit later.
Write first, edit later: placeholders like [fact], [example], or [screenshot] are fine. Keep moving.
Use transitions that guide the reader:
“Now that you’ve clarified the problem, let’s outline the steps.”
“Here’s how to turn that outline into a fast first draft.”
“To make this rank‑ready, add these on‑page SEO essentials.”
“Finally, tie it together with one clear CTA.”
Cap your first draft at a set time (e.g., 45–60 minutes). Perfection happens in editing.
At BlogBowl, you can lock in your voice once - our AI assists with structure and internal links while preserving your tone. You stay the author; the platform keeps your workflow fast and consistent.
Edit Like a Pro: Two‑Pass Checklist for Clarity and Flow
Editing is where a good draft becomes a great blog post. Run these two fast passes to sharpen meaning, tighten structure, and keep your voice crisp - so your blog workflow stays fast and consistent.
Pass 1 - Reader clarity
Remove fluff, tighten sentences, define terms
Verify the promise is fulfilled and steps are complete
Check skimmability: H2/H3 hierarchy, short paragraphs, bullets, bold key phrases
Confirm the hook (intro) matches the title and the outcome you promised
Ensure the CTA aligns with the single goal of this workflow blog post
Pass 2 - Polish and consistency
Tone, tense, and terminology consistency across sections
Parallel structure in lists and headings; smooth transitions between H2s
Fact‑check data and links; ensure examples are accurate and current
Verify internal links support discovery; add alt text for images
On‑page SEO: title tag, meta description, URL slug, headers, and keyword placement
Speed boosters
Read aloud for rhythm and clarity (you’ll catch clunky phrasing fast)
Swap one sentence per section for a punchier alternative
Use find/replace to standardize terminology (e.g., “blog workflow” vs. “workflow blog”)
Time‑box each pass (10–15 minutes each) to preserve momentum
Two‑pass editing checklist
What to check | Tools to use | Done |
|---|---|---|
Cut fluff; tighten sentences; define terms | Hemingway, Grammarly, BlogBowl Editor | [ ] |
Promise fulfilled; steps complete; title/intro alignment | Outline vs. draft comparison, BlogBowl Preview | [ ] |
Skimmability: H2/H3 hierarchy, short paragraphs, bullets, bold | BlogBowl SEO template, Readability checker | [ ] |
CTA fits the post goal and reads naturally | Goal doc, Internal link suggestions (BlogBowl) | [ ] |
Tone/tense/terminology consistency | Find/replace, Style guide, BlogBowl brand settings | [ ] |
Transitions between sections; parallelism in lists | Read‑aloud pass, Outline view | [ ] |
Fact‑check stats and claims; verify source links | Source docs, NN/g, Demand Metric, Link checker | [ ] |
Internal links added; external links reputable; no 404s | BlogBowl internal linking, Broken link checker | [ ] |
Image alt text added; file names descriptive | Media library, Accessibility checker | [ ] |
On‑page SEO: title tag, meta, URL slug, headers, keywords | BlogBowl SEO panel, SERP preview tool | [ ] |
When to stop
The post delivers the promised outcome, scans cleanly, and the CTA fits naturally
Facts and links are verified, voice is consistent, and the structure reads smoothly
You can read the H2s alone and still understand the value
You’re improving wording, not meaning - ship it and measure results
Tip: Save this checklist inside BlogBowl so every author’s blog post follows the same quality bar - making it easier to create blog content at scale without losing your voice.
On‑Page SEO Essentials: Make Your Blog Post Findable
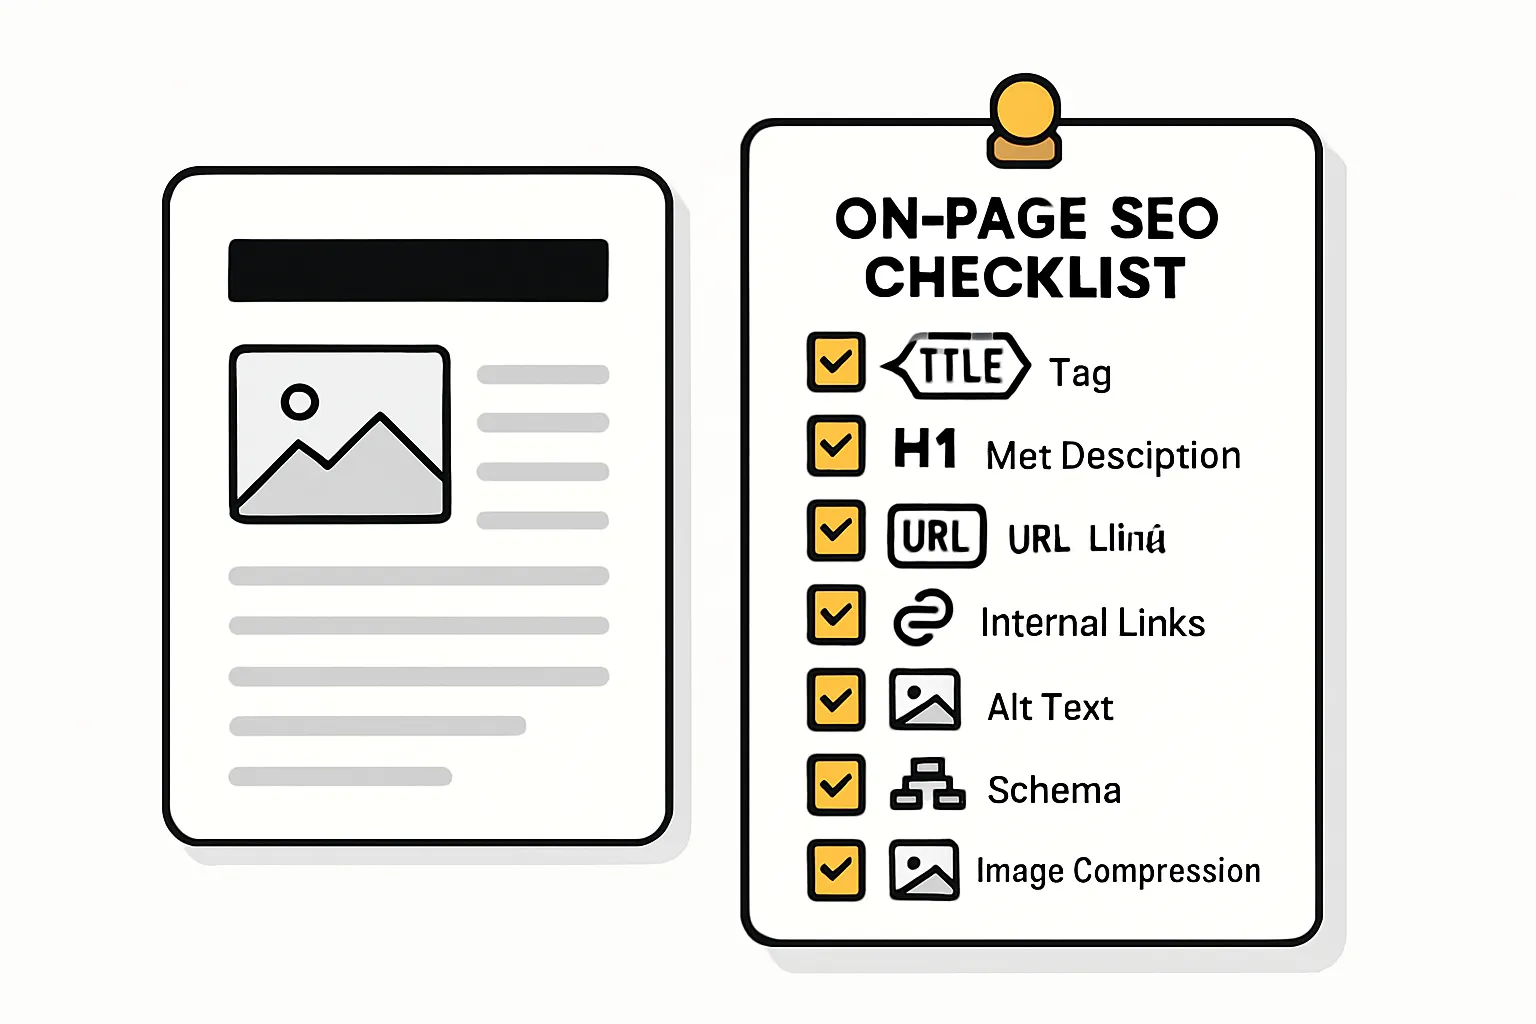
Great content deserves to be discovered. Use this focused checklist to help humans and search engines understand, rank, and recommend your blog post.
Strategic placement of your primary keyword
Title tag, H1, early in the intro, 1–2 H2s, URL slug, and meta description
Use natural phrasing - avoid stuffing and keep readability first
Add a semantically related phrase or two (synonyms, close variants)
Helpful structure for humans and search
Descriptive H2/H3 hierarchy; one idea per section
Internal links to related posts, feature pages, and docs
Add an FAQ section if intent warrants it (answer “People also ask” queries)
Use descriptive anchor text (“blog workflow checklist”) instead of “click here”
Technical must‑dos (lightweight and high‑impact)
Alt text for images: describe the image’s value in context (not keyword spam)
Compressed images (WebP/AVIF), clean URLs (short, readable), and sensible schema (Article/FAQ/HowTo) where relevant
Unique title tag (≤60 chars) and meta description (≈155–160 chars)
Check mobile rendering; ensure fast load and no layout shift
LLM‑friendly formatting
Clear sectioning, explicit definitions, and concise summaries improve AI snippetability
Use bullets and short, front‑loaded sentences for key steps or definitions
Include a one‑paragraph summary that states the problem, method, and outcome
Automation note
BlogBowl can auto‑insert internal links, optimize metadata, and attach schema where needed to speed up your blog workflow
Our SEO‑optimized templates ensure keywords appear in the right places while keeping your author’s blog voice intact
Add Visuals and CTAs: Design a Reader‑Friendly Post
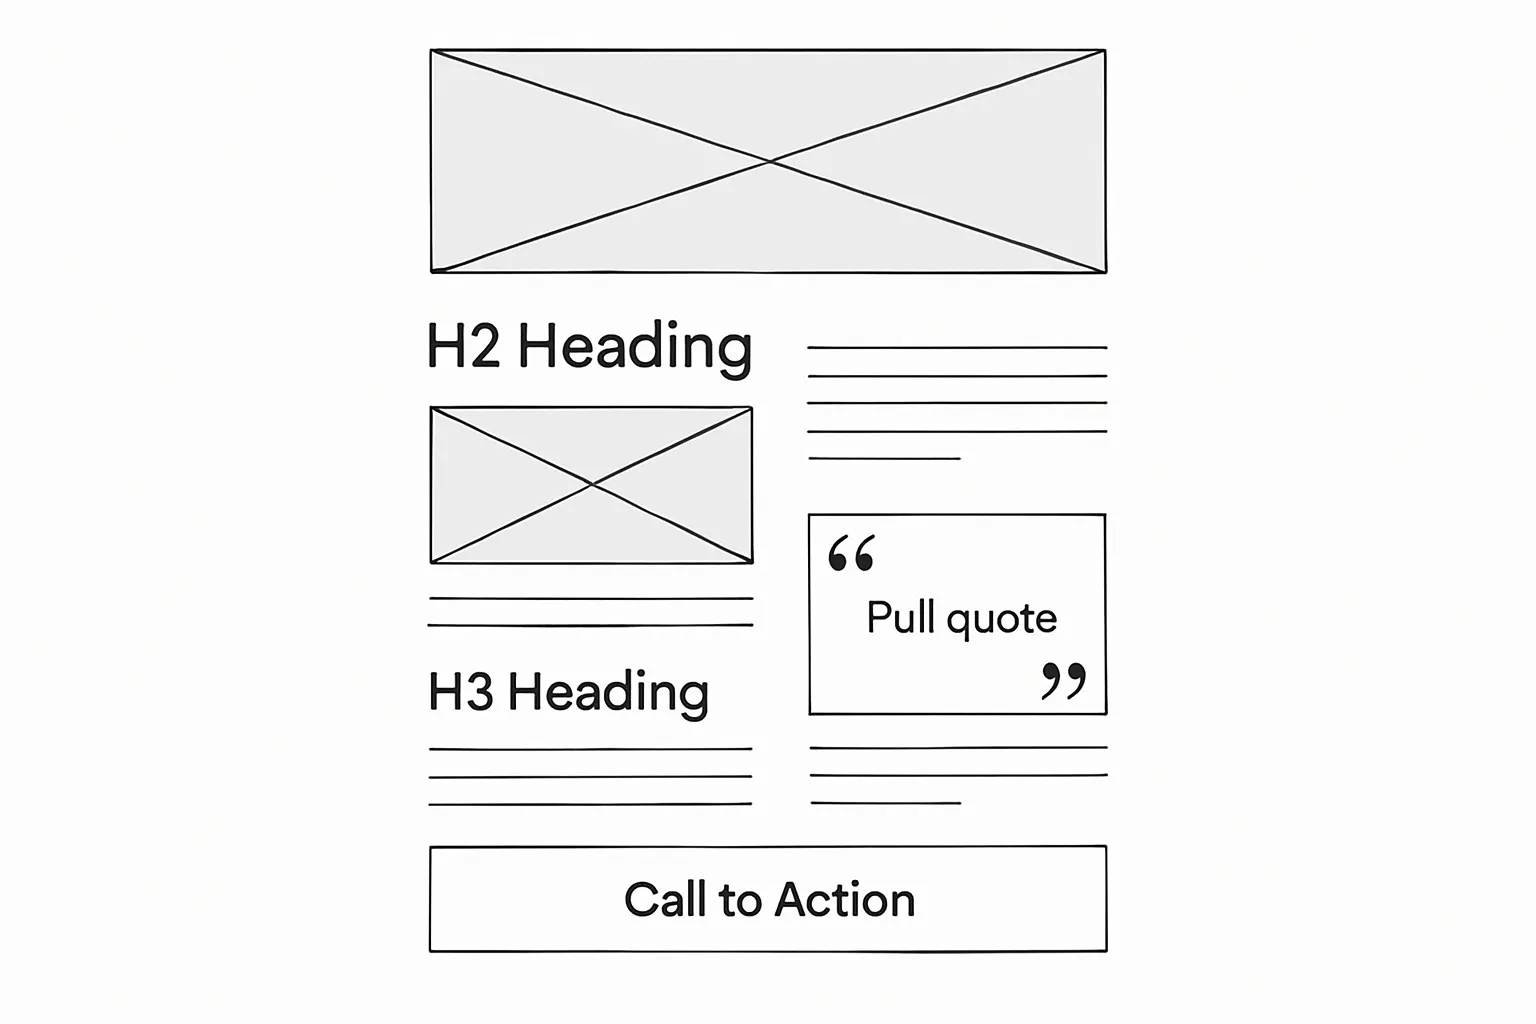
The right visuals and calls‑to‑action make your content easier to understand and more likely to convert. Design each element to serve the reader’s next step in your blog workflow.
Visuals with a purpose
Use diagrams, illustrations, or annotated screenshots to clarify each step or concept
Maintain a consistent illustration style and color palette across posts
Avoid decorative images with no instructional value
Accessibility and context
Write meaningful alt text that describes the image’s role (e.g., “Flowchart showing idea → outline → draft → publish pipeline”)
Reference the image in nearby copy so scanners understand why it’s there
Use embedded media thoughtfully
One relevant video near the top third of the post is plenty
Summarize the key takeaway above or below the embed for readers who prefer text
Ensure captions and transcripts are available for accessibility
CTA placement and style
Primary CTA: end of post (e.g., “Start your free BlogBowl trial” or “Get the checklist”)
Secondary (soft) CTA: mid‑post or sidebar (e.g., “Subscribe for weekly workflows”)
Match the CTA to the reader’s stage: subscribe (awareness), download (consideration), demo (decision)
Keep CTA copy benefit‑driven and specific (“Generate your first blog post in 60 seconds”)
Layout guidelines that boost reading ease
600–800px max paragraph width for optimal readability
Plenty of white space around images and CTAs to avoid crowding
Subhead every 150–250 words; use bullets and bolding to aid scanning
Keep image file sizes small (compressed WebP/AVIF) and add descriptive filenames
Pro tip: BlogBowl auto‑generates internal links and optimizes image alt text and dimensions, so you can focus on the visuals that clarify the message - and the CTAs that drive action.
Publish, Promote, and Repurpose: A 24‑Hour Distribution Plan
A fast distribution plan compounds the impact of every blog post. Use this 24‑hour checklist to ship confidently, spark engagement, and seed long‑term discoverability.
Pre‑publish checklist
Final preview on desktop and mobile; check spacing, images, and embeds
Verify all internal/external links; no 404s; open in new tab where appropriate
Metadata complete: title tag, meta description, social image/OG tags
Alt text added; images compressed; URL slug short and readable
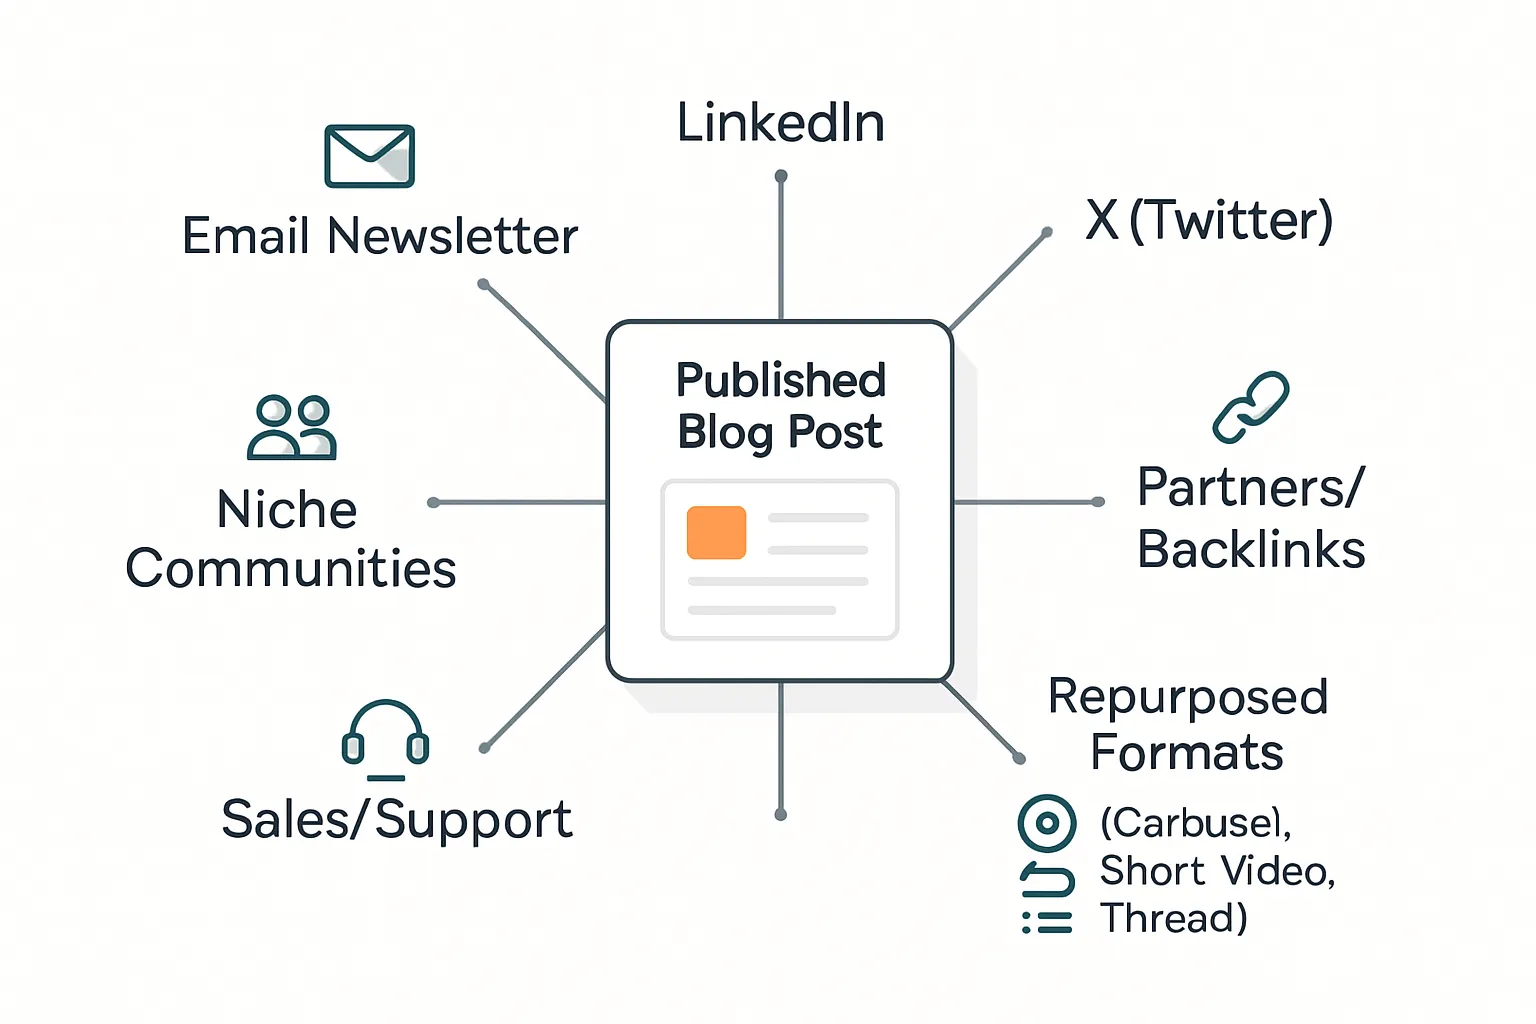
First 24 hours: your promotion playbook
Post to social with native snippets:
LinkedIn: problem → promise → 3 takeaways → link
X: 1 hook tweet + 2–3 threaded points → link in final tweet
Share in 1–2 niche communities (follow rules): add a 2–3 sentence summary and 1 question to invite discussion
Send a short newsletter blurb with the core takeaway and a single CTA
Outreach to one partner for a contextual backlink (offer an anchor they’ll like and the exact paragraph it fits)
Repurpose quickly
Turn key steps into:
A 6–8 slide carousel (one idea per slide, link in final slide)
A 30–60s short video (hook → tip → CTA)
A thread summarizing the outline or checklist
Always link back to the original post for depth and SEO equity
Internal distribution
Share with sales/support and summarize why it helps (use cases, objections handled)
Add to onboarding, help docs, or FAQs if relevant; link from relevant product pages
Create 2–3 internal links from existing posts to this one
Automation note
BlogBowl auto‑embeds media, schedules emails/newsletters, and supports automatic backlink exchange - so every post gets distributed across channels without extra lift.
Measure What Matters: Analytics and Iteration
Stop guessing. A simple measurement loop turns your first blog post into a compounding asset. Track what matters, learn fast, and make small, high‑impact updates.
Core KPIs for a first post
Organic clicks and position for your target keyword(s)
Time on page, scroll depth, and CTA conversions
SERP CTR (are your title/meta earning the click?)
Internal link clicks to priority pages
New subscribers or demo requests attributed to the post
Benchmarks to aim for early: 3–5% SERP CTR, 2:00–3:00 time on page, 50–70% median scroll depth, and 1–3% newsletter conversion (topic‑dependent).
Review cadence
Week 1: promotion metrics
UTM performance by channel (LinkedIn/X/email/communities), click‑through by snippet, comment/save rate
Action: double down on the 1–2 best hooks; pin and re‑share at high‑engagement times
Week 4: early SEO signals
Google Search Console impressions, queries discovered, average position, CTR by query, index coverage
Action: tighten title/meta to boost CTR; add internal links from 3–5 relevant posts/pages
90 days: update plan
Rank movement, query gaps (“People also ask”), competitors’ updates
Action: enrich examples, add missing FAQs, refresh stats, improve intro/CTA, consider FAQ/HowTo schema
Improve with intent
Add missing FAQs that align with “People also ask”
Tighten the intro to restate the problem and the specific outcome
Sharpen the CTA to one clear next step; align with your post goal
Enrich examples with micro‑stories, updated data, and clearer steps
Revisit H2/H3s for scannability; front‑load the benefit in each section
Leverage tooling
Use BlogBowl’s privacy‑friendly analytics to track:
Per‑post engagement (time, scroll, exits), CTA conversions, and internal link flow
Author performance and topic clusters that drive the most signups or demos
BlogBowl automations:
Suggest internal link opportunities and surface decaying posts for refresh
Pull search queries and show keyword movement to guide updates
Log each change in a built‑in changelog so you can correlate edits to results
Make iteration a habit: measure → diagnose one bottleneck → update → re‑index → review in 14–28 days. Small, focused improvements beat sporadic rewrites - and keep your author’s blog growing steadily.
Conclusion: Launch Your First Post with BlogBowl
You’ve got the workflow: plan with purpose, outline fast, draft in your author’s voice, polish with a two‑pass edit, optimize on‑page SEO, and distribute smartly. Now it’s time to launch your first blog post - and keep the momentum going with a repeatable blog workflow that helps you create blog content consistently.
Your next steps
Pick one audience problem, outline with the 60‑minute sprint, draft fast, edit clean, and hit publish
Promote for 24 hours, then measure and iterate across 30–90 days
Why BlogBowl now
Launch a professional, fast, SEO‑optimized blog in under 60 seconds
Automate daily content creation, internal linking, metadata, and embedded media - without losing your author’s blog voice
Built‑in newsletter, analytics, and custom domain support to grow on autopilot
Privacy‑friendly analytics and automatic backlink exchange to compound reach
Templates that rank, AI assistance that saves time, and zero code required
Ready to create your first blog post and keep publishing without the technical hassle? Start with BlogBowl today: https://www.blogbowl.io