


Why adding your blog to Google matters (indexing basics and the game plan)
"As of November 2025, Google's global search engine market share stands at 89.94%." - Source
When you add your blog to Google, you’re placing your content where your audience already searches. Whether you're aiming to publish your blog as a growth engine or want your google blog posts to surface in the blog search engine and AI answers, indexing is the foundation. Do this right once, and every post you ship can compound.
What “indexing” actually means (and how discovery works)
Google uses a three-step process to surface content:
Discovery: Googlebot finds URLs via links (internal and external), sitemaps, RSS/Atom feeds, and submitted URLs. Internal linking and a clean sitemap help your new posts get discovered fast.
Crawling: Googlebot requests the page, checks robots rules, fetches resources (CSS/JS), and evaluates technical quality.
Indexing: Google parses your content, determines the canonical URL, and decides whether to include it in search results.
To make sure your site is actually indexable before you try to add your blog:
Don’t block Google: Ensure robots.txt allows crawling for your main paths (no disallow on your blog directory) and your important pages aren’t marked noindex.
Use clean canonicals: Set a self-referencing rel=“canonical” on each post to avoid duplicate URL variants competing with each other.
Serve fast, accessible HTML: Pages should load quickly, be mobile-friendly, and return 200 OK (not 302/307/soft 404).
Keep one primary URL per page: Avoid duplicate parameters and session IDs. If you must have variants, canonicalize them.
Ensure your blog templates expose content: If your theme hides core content behind scripts, Google may not see it reliably - rendered HTML is safest.
With BlogBowl, your posts ship on lightning-fast, SEO-optimized templates with proper canonicals, feeds, and internal links, so Google can crawl and index without friction.
The end-to-end plan you’ll follow in this guide
Set up Google Search Console correctly
Verify your domain or URL prefix with the right protocol (https://).
Add all key variants (with/without www) and set your canonical preference at the site level.
Build the right sitemap for your blog and host it in the right place
Choose XML, RSS/Atom, or text based on your platform and scale.
Host at your site root when possible (for maximum coverage) and make sure URLs are absolute.
Submit the sitemap and verify coverage
Submit in Search Console, reference it in robots.txt, and monitor the Sitemaps and Pages reports.
Fix coverage issues and improve internal linking for faster crawling
Resolve “Indexed, not submitted in sitemap,” “Discovered – currently not indexed,” and soft 404s.
Strengthen internal links from your homepage, category pages, and recent posts widget to push crawl priority.
Use RSS/Atom feeds for fresh content discovery alongside your XML sitemap.
BlogBowl automates this entire workflow - creating and updating sitemaps, submitting to Google, and stitching internal links so every new post gets discovered quickly.
Key outcomes
Get your blog posts showing on Google (and other AI search tools) reliably
Publish your blog with SEO-ready structure and sitemaps that Google can fetch consistently.
Ensure your content appears in AI-powered overviews and assistants that rely on Google-indexed sources.
Understand safe ways to accelerate indexing without spam
Use XML sitemaps plus RSS/Atom, fresh internal links, and Search Console’s “Request indexing” for critical URLs.
Avoid manipulative ping spams or mass low-quality URL submission - focus on crawlable quality.
Learn platform-specific sitemap URLs and automation options
Blogger: Atom feed-based sitemaps (and variants) for “google blog create” setups.
WordPress: Core or SEO plugin XML sitemaps, plus RSS for freshness.
Static sites: Build XML sitemaps during deployment; add a minimal text sitemap when needed.
BlogBowl: Generates, hosts, and updates sitemaps automatically, with internal linking and media embedding baked in.
Target-keyword alignment
When you add your blog to Google the right way, you help the blog search engine understand your site structure, make it easier for users to find your google blog posts, and safely publish your blog at scale. Whether you’re doing google blog writing on WordPress, Blogger, or a static site, this guide shows exactly how to build and submit sitemaps so you can blog create google-friendly pages that get indexed and seen.
Set up Google Search Console (property types, correct URL, and verification)
"The URL Inspection tool provides detailed crawl, index, and serving information about your pages, directly from the Google index." - Source
Create/access your Search Console account
Go to Google Search Console and click “Start now.”
Sign in with the Google account you’ll use for ongoing SEO management (owner-level access preferred).
Choose the right property type
Domain property (recommended for most sites): Covers all subdomains (www/non-www) and both HTTP/HTTPS. Best for blogs with custom domains, multiple subdomains, or future migrations.
URL-prefix property: Tracks only the exact protocol and host you enter (e.g., https://www.example.com). Useful for platform-specific blogs or when your canonical URLs live on one host only.
When to choose which:
Use Domain property for custom domains and SaaS blogs that may add subdomains or change protocol.
Use URL-prefix for hosted blogs (e.g., a single https://blog.example.com) or when you need granular verification quickly.
Add your site using the exact, canonical URL
Always include protocol and host variant:
https://www.example.com or https://example.com (match your canonical tags).
Why it matters:
Submitting https://example.com but serving canonicals on https://www.example.com can cause “couldn’t fetch” sitemaps, missing Page/Indexing data, and split reports.
Add both variants in URL-prefix if you’re unsure, then confirm which one your site uses as canonical.
Verify your site (fast methods)
Supported verification options:
HTML tag (meta): Paste the provided meta tag into the
DNS (TXT): Add a TXT record at your DNS provider (best for Domain property).
Google Analytics: Works if the same Google account has sufficient permissions and GA is installed correctly.
Google Tag Manager: Verify via published GTM container with the same account.
Practical verification checklist:
Ownership: Use the account that owns DNS/analytics/containers.
Live tag: View source to confirm the meta tag is present on the live page.
DNS propagate: Allow time for TXT records to propagate (often minutes, sometimes longer).
Cache cleared: Purge CDN/caching layers after adding tags.
Re-check: Click “Verify” again in Search Console after changes are live.
Pro tip
Verify a Domain property plus the key URL-prefix variants that appear in your canonical URLs. You’ll get complete coverage and avoid sitemap mismatches during submissions.
Where this fits in the workflow
Verification unlocks URL Inspection, Coverage (Pages), Sitemaps, and Core Web Vitals reports - tools you’ll use to submit sitemaps, diagnose indexing issues, and validate fixes throughout this guide.
Build the right sitemap for your blog (formats, limits, and best practices)
"Each sitemap file is limited to 50,000 URLs or 50MB (uncompressed); larger sets must be split and referenced by a sitemap index." - Source
Which sitemap format should you use?
XML: Most versatile. Supports images, video, news, and hreflang. Ideal when you want full control and rich metadata for your google blog posts.
RSS/Atom: Easiest for blogs. Often auto-generated by CMS and perfect for fresh content discovery. Great when you want to publish your blog quickly and keep Google in sync.
Text: A simple list of absolute URLs. Useful for static sites and at-scale projects where you can script URL output.
Sitemap best practices you shouldn’t skip
Use absolute, canonical URLs only: Avoid relative paths and duplicate variants.
UTF-8 encoding; host at site root if possible: e.g., https://example.com/sitemap.xml for maximum coverage.
Keep sitemaps lean and accurate: Don’t include noindex, blocked, or 404 pages; ensure lastmod is trustworthy if used.
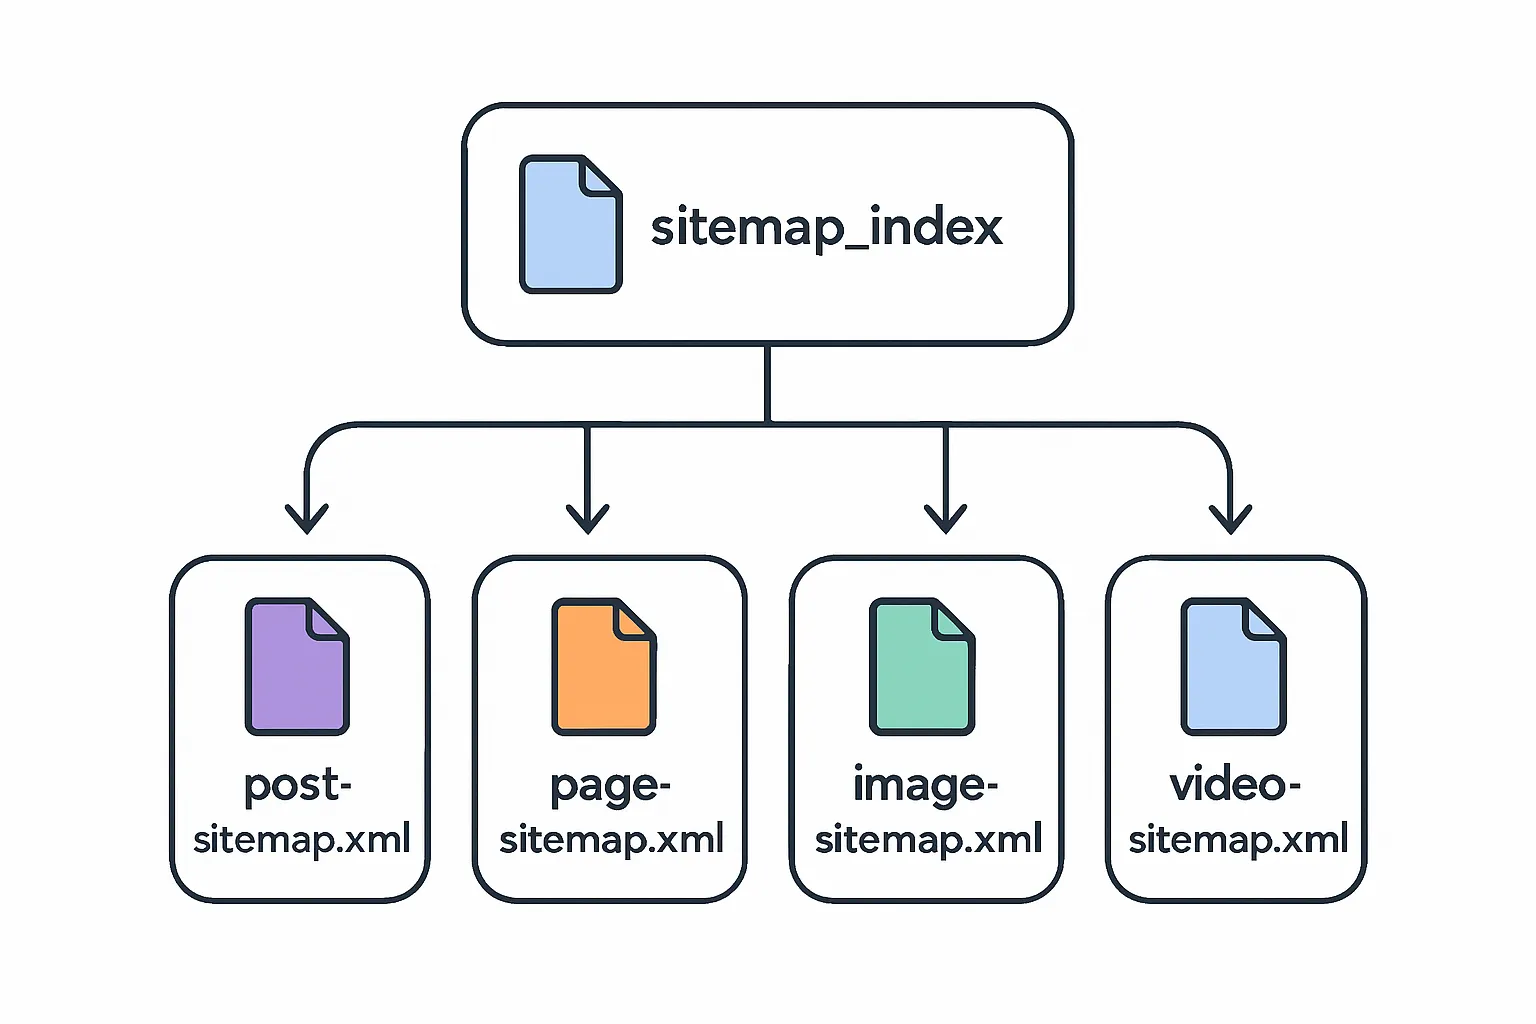
Scale gracefully: For large blogs, split into multiple sitemaps and reference them via a sitemap index (sitemap_index.xml).
When feeds are enough vs when you need XML
Feeds are enough when:
You run a small blog or a CMS where RSS/Atom is auto-generated and reliable for recent posts.
You want Google to pick up new content fast without managing XML complexity.
Use XML when:
You need images/video/news extensions, hreflang support, or consistent lastmod management.
You’re growing and want multiple sitemaps (posts, pages, categories) combined in an index for better reporting.
Location and structure tips
Primary location: https://example.com/sitemap.xml or a sitemap index at https://example.com/sitemap_index.xml.
Redundancy: List your sitemap in robots.txt:
Sitemap: https://example.com/sitemap.xml
Use absolute URLs within each sitemap; keep file names stable and predictable.
What we’ll do next
Identify your platform’s best sitemap format and URL (XML, RSS/Atom, or text), confirm it’s reachable, then submit it in Search Console.
Sitemap format comparison
Format
Pros
Cons
Best use-cases
Extensibility (images/video/news)
Ease of maintenance
XML
Most control; supports hreflang and lastmod; rich media support
More complex to create/validate; needs accuracy
Growing blogs, media-rich sites, internationalization
Yes (images/video/news)
Medium (often automated by CMS/plugins)
RSS/Atom
Auto-generated by most CMS; great freshness signal
Limited metadata; not ideal for all historical URLs
Blogs prioritizing recency and simplicity
Limited (video via mRSS)
Easy
Text
Easiest to script; scalable for static builds
URLs only; no metadata
Static sites, large auto-generated catalogs
No
Easy (scripted during deploy)
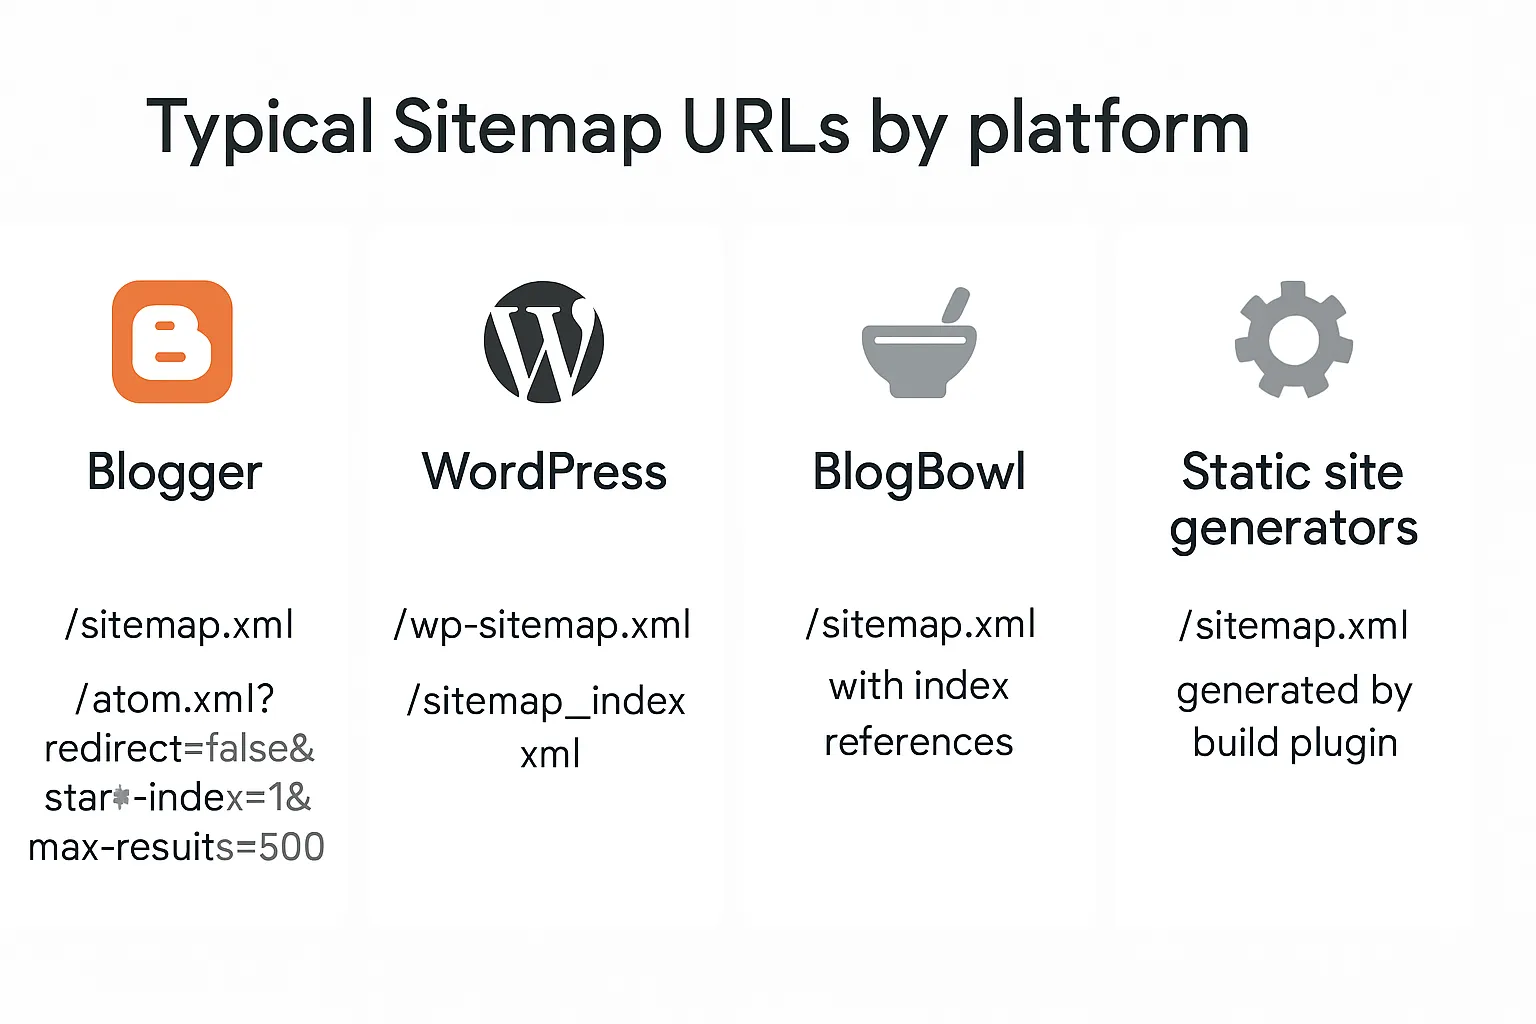
Platform-specific sitemap URLs (Blogger, WordPress, BlogBowl, and static sites)
Blogger (Blogspot and custom domains)
Preferred: https://yourblog.example/sitemap.xml - Blogger now exposes a sitemap endpoint that references recent posts.
Alternative feed-based sitemap for posts: https://yourblog.example/atom.xml?redirect=false&start-index=1&max-results=500
Common pitfalls:
Submitting the wrong variant (www vs non-www) or protocol (http vs https).
Adding the sitemap to a different Search Console property than the exact URL you submit.
WordPress
Core XML sitemap (WP 5.5+): https://example.com/wp-sitemap.xml
SEO plugin indexes:
Yoast SEO: https://example.com/sitemap_index.xml
Rank Math/All in One SEO: similar /sitemap_index.xml patterns
Tip: Choose one canonical set to submit in Search Console. Avoid submitting both core and plugin sitemaps simultaneously.
BlogBowl
Default: https://example.com/sitemap.xml - automatically generated and updated. When your site grows, BlogBowl outputs a sitemap index referencing posts, pages, and media feeds.
Benefit: You focus on content while BlogBowl handles structure, internal linking, and media embeds that improve discovery and crawl depth.
Static site generators (e.g., Next.js, Gatsby, Hugo)
Generate on build: Use official/community plugins to produce /sitemap.xml during deploy.
Consistency: Ensure canonical URLs match the deployed domain (and www vs non-www preference).
Redundancy: Add a robots.txt directive:
Sitemap: https://example.com/sitemap.xml
Submit your sitemap to Google (Search Console and robots.txt)
"Submitting a sitemap is merely a hint: it doesn’t guarantee that Google will download the sitemap or use the sitemap for crawling URLs on the site." - Source
Submit in Search Console (recommended)
Open Indexing > Sitemaps.
Enter your sitemap or sitemap index path (e.g., sitemap.xml) and submit.
Status meanings:
Success: Fetched and processed. Monitor discovered URLs and coverage.
Couldn’t fetch: Google couldn’t access the file (check URL variant, HTTPS cert, 200 status, robots).
Has errors: File is reachable but contains issues (invalid URLs, bad XML, wrong encoding).
Submit via robots.txt (nice redundancy)
Add a Sitemap directive to help Google discover sitemaps automatically during the next robots crawl.
Handling multiple sitemaps
Prefer a sitemap index (e.g., /sitemap_index.xml) and submit just the index.
Or submit separate sitemaps (posts, pages, categories) to track performance and errors per section.
Important expectations
Submission is a hint, not a guarantee. Indexing speed depends on content quality, internal links, crawl budget, and overall site health.
What you’ll do after submission
Monitor Coverage and Pages reports in Search Console.
Fix errors and exclusions (soft 404, Discovered – currently not indexed, Duplicate without user-selected canonical).
Improve internal linking from home/category pages to new posts.
Keep sitemaps fresh and ensure lastmod values remain accurate.
txt
robots.txt
User-agent: * Disallow:
Single sitemap
Sitemap: https://example.com/sitemap.xml
Multiple sitemaps (optional)
Sitemap: https://example.com/sitemap_posts.xml Sitemap: https://example.com/sitemap_pages.xml Sitemap: https://example.com/sitemap_index.xml
## Fix coverage issues and improve crawlability 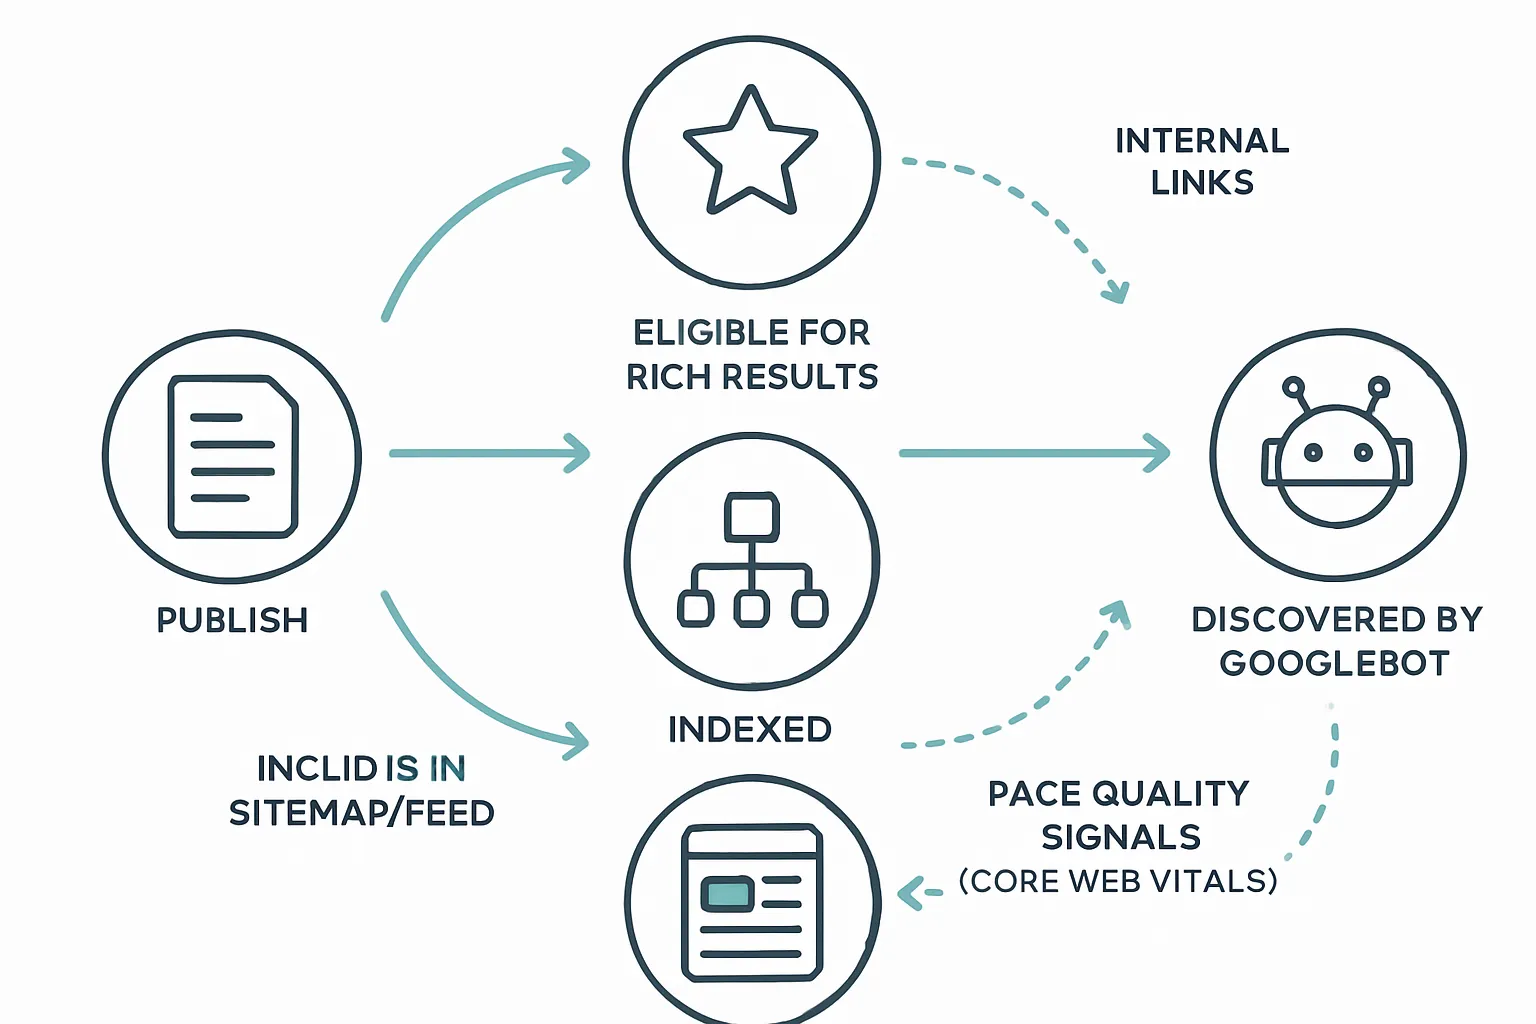 ### Read the Coverage/Pages reports - Indexed: The URL is in Google’s index and can appear in results. - Crawled - currently not indexed: Google fetched the page but chose not to index (often quality or duplication). - Discovered - currently not indexed: Found via links/sitemap but not crawled yet (crawl budget or low priority). - Excluded by ‘noindex’: Page explicitly tells Google not to index. - Alternate page with proper canonical tag: Duplicate variant; canonical selected elsewhere (expected behavior). - Soft 404: Page returns 200 but looks like an error/thin page. - 404: Not found; remove from sitemaps and fix internal links. - Redirect: Consolidated; ensure the final destination is canonical and in your sitemap. ### Common fixes that actually work - Remove noindex on pages you want indexed; only unblock in robots.txt when necessary (don’t block important resources). - Ensure 200 status on canonical URLs; eliminate soft-404 patterns (add substance, unique value, correct titles/meta). - Strengthen internal linking to orphaned pages; add navigation links, recent/related posts, and category hubs. - Submit updated sitemaps after major content batches or structural changes to speed discovery. ### Performance and quality signals - Improve Core Web Vitals (especially LCP) and overall speed to aid crawling and rendering efficiency. - Fix duplicate and thin content; merge near-duplicates, use rel=“canonical,” and align titles/H1s with unique intent. ### Validate fixes - Use URL Inspection: - Test Live URL to see current crawlability and rendered HTML. - Request indexing after resolving issues on priority pages. - Confirm Google-selected canonical matches your intended canonical. ### Prioritize for impact | Issue type | What it means | How to fix | Validation steps | Priority | | --- | --- | --- | --- | --- | | Discovered - currently not indexed | URL found but not crawled yet | Boost internal links; include in sitemap; improve importance (homepage/category links) | URL Inspection > Test Live; watch for crawl date | High | | Crawled - currently not indexed | Crawled but not added to index | Improve content depth/uniqueness; add media; refine headings; fix thin/duplicate patterns | Request indexing; re-check Pages report trend | High | | Excluded by ‘noindex’ | Meta robots or HTTP header prevents indexing | Remove noindex for pages you want in search; confirm templates | Test Live URL; view source for meta robots | High | | Soft 404 | 200 page with error/low-value signals | Add unique content, fix empty states, correct canonical; ensure correct 404s for true errors | Fetch and render; compare before/after | High | | 404 | URL doesn’t exist | Remove from sitemaps; fix or redirect internal links; add 301 for valuable moved pages | Crawl site; re-submit sitemap | Medium | | Redirect | URL redirects to another | Ensure final URL is canonical and in sitemaps; update internal links to point directly | Inspect destination URL; check canonicals | Medium | | Alternate page with proper canonical | Duplicate variant; canonical selected elsewhere | Keep only the canonical in sitemaps; ensure self-referencing canonical on primary | Inspect canonical URL; confirm indexation | Medium | | Blocked by robots.txt | Crawlers disallowed | Unblock critical paths; avoid blocking CSS/JS needed for rendering | robots.txt tester; Test Live URL | Medium | | Duplicate without user-selected canonical | Multiple similar URLs, no clear primary | Choose a canonical; consolidate with redirects; standardize internal links | Inspect URL; verify Google-selected canonical | High | - Start with “money pages” and high-traffic posts, then fix issues affecting many URLs (templates), and finally long-tail items. ## Accelerate indexing safely (no spam tactics) ### Do the fundamentals well - Keep XML sitemaps and feeds current; update lastmod accurately so Google can prioritize fresh changes. - Build strong internal links: link new posts from high-authority pages (homepage, category hubs, cornerstone guides). Add “recent” and “related” widgets to cut down orphaned URLs. - Ensure mobile-friendly, fast pages: pass Core Web Vitals, minimize CLS, compress images, and serve a stable 200 status. Fix sitewide errors quickly to avoid wasting crawl budget. - Canonicals and accessibility: use a self-referencing canonical on each post and ensure primary content is accessible in HTML (not hidden behind client-side rendering). Tip for BlogBowl users: Your sitemaps and internal linking are automated, keeping discovery signals up-to-date as you publish your blog and scale output. ### Use URL Inspection wisely - Request indexing only after substantive updates (new sections, major rewrites, fixed technical blockers). Avoid repeated, rapid requests - this doesn’t speed things up and can throttle your ability to submit. - Before requesting: Test Live URL to confirm it returns 200, isn’t blocked by robots, renders content, and shows the intended canonical. - For batches: Update sitemaps and let Google discover the changes naturally; reserve “Request indexing” for mission-critical pages. ### Leverage feeds and WebSub - Maintain RSS/Atom feeds in parallel with your XML sitemap for strong freshness signals. - Enable WebSub (if your CMS/plugin supports it) so search engines are notified of new content as it’s published. - Platform pointers: - WordPress: Default /feed plus plugin support for WebSub. - Blogger: Atom feed available by default. - Static sites: Generate a feed in the build; ping a WebSub hub if supported. - BlogBowl: Publishes compliant feeds and keeps discovery signals current automatically. ### Optimize what you control - Titles and URLs: Write descriptive, unique titles and use clean, human-readable slugs. - Structured data: Add Article, Breadcrumb, and relevant schema to help interpretation and eligibility for rich results. - Avoid duplicates: Consolidate similar pages, standardize trailing slashes/parameters, and use canonical tags or redirects. - Media hygiene: Compress images, lazy-load responsibly, and include alt text; ensure CSS/JS aren’t blocked so Google can render the page. ### What to avoid - Paid “instant indexing” schemes, doorway pages, or thin AI-only pages. These can damage trust, waste crawl budget, or lead to persistent “Crawled - currently not indexed.” - Mass URL submissions, ping spamming, or creating dozens of near-duplicate pages to “force” indexing. - Blocking required resources (CSS/JS/fonts) or shipping soft-404 pages with little to no content. Safe acceleration checklist: - Accurate sitemap and feed signals (lastmod, new URLs added promptly). - Strong, contextual internal links to every new post. - Fast, mobile-first pages with valid markup and stable 200 responses. - Prudent use of URL Inspection for important updates only. Do these consistently and you’ll reliably add your blog to Google, with your google blog posts discovered quickly by the blog search engine - no spam tactics required. ## Troubleshooting sitemaps and Submission errors (Blogger, WordPress, static)  ### “Couldn’t fetch” on sitemap submission - Match the verified property: Ensure the property variant (https vs http, www vs non-www) matches the sitemap host exactly. - Confirm HTTP status: The sitemap URL must return 200 OK with the correct content-type (application/xml or text/xml), not 3xx/4xx. - Blogger tips: - Try https://yourblog.example/sitemap.xml first. - Alternative: https://yourblog.example/atom.xml?redirect=false&start-index=1&max-results=500 - Submit the version that matches the property’s host and protocol. ### 404 or blocked sitemap - robots.txt: Make sure you aren’t disallowing the sitemap path or essential resources. - Regenerate and redeploy: For WordPress, refresh plugin settings or flush permalinks; for static sites, rebuild to regenerate /sitemap.xml and re-upload. ### Non-canonical or redirected URLs in sitemaps - Only include final, canonical URLs (200 OK). - Remove redirected, parameterized, or session-driven URLs. - Align sitemap URLs with your site’s rel="canonical" tags. ### Very large blogs - Split by section or date (e.g., posts-2025-01.xml, posts-2025-02.xml). - Reference them in a sitemap index (sitemap_index.xml). - Keep each file under 50,000 URLs and 50MB uncompressed. ### Validation workflow - Open the sitemap in a browser to verify it loads, shows valid XML, and uses absolute URLs. - Use URL Inspection on representative pages to confirm they’re indexable (no noindex, allowed by robots, 200 status). - Re-submit in Search Console and monitor the Sitemaps and Pages reports for processing results and errors. ## Conclusion: Start growing search traffic on autopilot with BlogBowl ### You now have the playbook - Add your blog to Google the right way: verify in Search Console, build and submit sitemaps, fix coverage issues, and improve internal linking and page quality. - Keep your feeds and XML sitemaps current, prioritize fast, mobile-friendly pages, and use URL Inspection for important updates. - With this workflow, your google blog posts are easy for the blog search engine to discover, index, and rank - no spam tactics required. ### Why use BlogBowl to publish your blog and scale - Launch a professional, SEO-optimized blog in under 60 seconds - no code required. - Automated, daily high-quality content creation via AI, including smart internal linking, keyword research, and embedded media. - Lightning-fast, SEO-focused templates engineered to perform on Google and AI search tools. - Built-in analytics and newsletter, unlimited blogs/docs, and seamless custom domains. - Automatic sitemaps, feeds, and internal linking ensure new posts are discovered fast and safely. - Manage multiple blogs and authors with ease, while BlogBowl handles structure, indexing signals, and technical SEO. ### Next steps - Create your BlogBowl account, connect your domain, publish your first posts, and submit your sitemap once. From there, BlogBowl keeps content and structure fresh so Google can find new posts quickly and reliably. - If you’re ready to add your blog, publish your blog fast, and make google blog create simple and scalable - start now. - Get started: https://www.blogbowl.io